
How to Get Rid of Earwigs: 8 Effective, Safe Methods That Work
To get rid of earwigs, start by confirming the insect is truly an earwig, then use simple traps like rolled newspaper or oil pitfall cups to catch them quickly. Sealing entry points and applying natural repellents can keep them out of your home and garden. For large infestations, consider professional help, especially if DIY methods don’t work.
This information is for homeowners and gardeners dealing with earwig invasions. You’ll learn how to identify earwigs, stop them from entering your spaces, use effective traps and repellents, prevent damage, and maintain control over time without relying heavily on chemicals.
Key Takeaways
- Maintain indoor humidity below 60% to discourage earwigs, as they thrive in moist environments above 70% relative humidity.
- Seal cracks and gaps around your home and keep mulch or debris at least 6 to 12 inches away from the foundation.
- Set traps by covering a plastic container with a lid pierced with 0.25-inch holes to capture earwigs effectively overnight.
- Spritz earwigs directly with a 70% rubbing alcohol and water mix for quick, non-toxic elimination.
- Apply a 0.5% spinosad grain bait in gardens for 86, 100% earwig knock-down within 72 hours, safe for pollinators and pets.
- Plant thyme, wormwood, or tansy near garden beds to repel about 40% of foraging earwigs using natural terpenoid volatiles.
How to Identify and Understand Earwigs

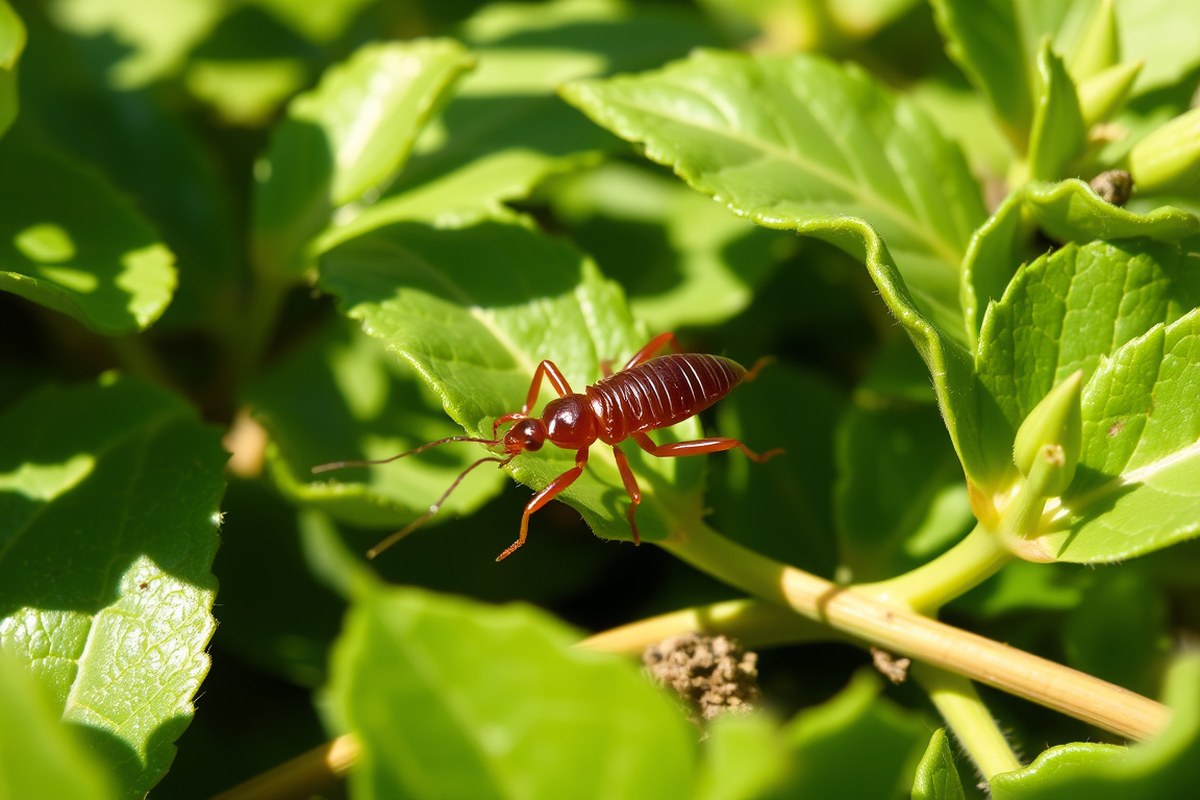
Earwigs are small, slender insects about ½ to 1 inch long, easily recognized by their elongated, reddish-brown bodies and dark brown to black heads. Their most distinctive features are the pincers, or forceps, at the rear of their abdomen, which curve inward in males and are straighter in females. These pincers are often mistaken for dangerous weapons, but they rarely break the skin and carry no venom. Earwigs may try pinching if handled, but their pinch is generally not painful or harmful.
These insects are mostly active at night and hide during the day in damp, dark places like under mulch, stones, or leaf piles. They favor cool, moist environments and often crawl into homes searching for similar conditions. Unlike slugs or snails, which leave shiny slime trails, earwigs leave behind tiny black pellets but no slime. Their feeding activity produces jagged, irregular edges on leaves, rather than smooth holes, and this damage typically appears on soft fruits, young seedlings, and leafy plants like lettuce, dahlias, and hostas. Identifying earwig damage means looking for these ragged leaf edges combined with the absence of slime trails.
While earwigs do cause some damage by feeding on tender plant material, they also help your garden by eating soft-bodied insects such as aphids, mites, and codling-moth eggs. This dual role means earwigs are both pests and beneficial predators. Monitoring their numbers can help you decide whether removal efforts are necessary. Signs of a heavy earwig presence include large numbers found during nighttime inspections or in areas with excessive moisture, such as near gutter leaks or deep mulch.
To identify earwigs, check these factors: size around ½ to 1 inch, reddish-brown color, presence of curved pincers on the abdomen, jagged leaf edges on plants without slime trails, and tiny black pellets nearby. Behavioral clues include nocturnal activity and preference for moist, shaded areas. Knowing these details helps you pinpoint earwigs among other pests and understand the extent and type of damage they cause. Preventing and managing earwig problems successfully depends on accurate identification and observing patterns in their activity and signs around your home and garden.
Why Earwigs Invade Homes and Gardens

Earwigs invade homes and gardens primarily because they seek moisture, shelter, and food. These insects thrive in damp environments and tend to hide in dark, humid places during the day. In your home, they often appear in basements, bathrooms, or under sinks where humidity commonly exceeds 60%. Maintaining controlled indoor humidity below this level can discourage their presence.
In gardens, earwigs are attracted to moist, shady areas that offer protection and easy access to food. Overhanging branches and thick shrubs near your home create damp microclimates perfect for earwigs. Trimming these back reduces shade and moisture buildup, making your garden less hospitable for them. Clearing away mulch and dead plants around your house also removes shelter and food sources, forcing earwigs to seek other locations.
Earwigs feed primarily on decaying plant matter but also consume tender leaves, flowers, and fruit, which can cause damage to garden plants. This leaf-feeding often appears as ragged edges or holes on plants. While they typically do not threaten the structural parts of homes, they may enter houses searching for food or a place to lay eggs when outdoor conditions become unfavorable. As nocturnal insects, they are mainly active at night and hide during the day.
Seasonal and regional conditions influence earwig activity. Expect increased infestation in rainy years or wetter seasons when moisture levels rise. Earwigs will move closer to your home and garden plants as soil and mulch remain damp for longer periods. In dry conditions, earwigs tend to move on as they require moisture to survive.
Regularly inspecting gutters and downspouts to ensure proper drainage away from your home helps prevent moisture accumulation that attracts earwigs. Addressing damp spots around foundation walls and reducing shaded, moist zones by pruning and clearing vegetation is essential. In regions with heavy rainfall or during spring and fall, their peak activity seasons, more vigilance is necessary to protect your home and garden.
Check your home and garden for moist, shaded spots and remove those conditions first to reduce earwig attraction and prevent future infestations.
Effective Inspection and Sealing Techniques to Keep Earwigs Out
Inspect the exterior and interior of your home carefully for places where earwigs can enter or hide. Seal cracks, gaps, and vents with caulk, weatherstripping, or screens to block these entry points. Control moisture levels by fixing leaks and improving drainage to make your home and garden less attractive to earwigs.
Step 1: Inspect Common Entry Points and Hiding Spots
Earwigs enter homes through small gaps and cracks near doors, windows, vents, and utility lines. Check the foundation, siding, door sweeps, and window frames for openings. Inside, look for damp areas in basements, laundry rooms, and under sinks where earwigs might hide. Outdoors, inspect mulch beds, wood piles, and dense vegetation close to your home’s foundation.
Use a flashlight and a screwdriver or putty knife to probe cracks and crevices. Take note of worn or damaged door sweeps and holes in window screens. Check vent covers, especially those connected to laundry exhausts or crawlspaces, as uncovered vents invite earwigs attracted to moist air. Follow these steps to conduct a thorough inspection:
- Walk around your home’s exterior at dusk when earwigs are more active.
- Examine doors and window frames for gaps bigger than 3 mm (about 1/8 inch).
- Look under mulch and around wood piles close to your foundation for earwig activity.
- Inspect screens on windows, vents, and crawlspaces for holes or tears.
- Check inside basements and laundry rooms for damp spots or leaks.
- Review plumbing and electrical penetrations for small openings.
- Monitor plants and soil close to entry points for signs of earwigs.
Step 2: Seal Cracks, Vents, and Gaps Properly
Use caulk or weatherstripping to close up the gaps you found during inspection. Seal cracks in your foundation, around windows, doors, vents, and utility penetrations with silicone or acrylic latex caulk. Replace damaged door sweeps and add foam insulation tape or weather stripping to door bottoms. Fit fine-mesh screens on vents and crawlspace openings to block earwigs while allowing ventilation. Applying the right materials and techniques is essential for lasting sealing:
- Clean surfaces thoroughly before applying caulk or weatherstripping.
- Use caulk to fill cracks 3 mm or wider, ensuring a continuous bead along the gap.
- Install new door sweeps if the old ones are cracked, brittle, or missing.
- Attach screens over vents with secure fasteners to prevent earwigs from squeezing through.
- Seal small holes around pipes and electrical wires with expanding foam or caulk.
Effective sealing costs can range from $10 to $30 for caulk tubes or weather-stripping materials. These measures usually take just a few hours for average homes and can significantly reduce earwig entry. Poor sealing allows earwigs to keep entering, so inspect and maintain seals seasonally.
Step 3: Remove Moisture Sources and Improve Drainage
Earwigs seek out moist environments, so reducing moisture indoors and outdoors is critical. Fix leaks promptly in faucets, pipes, and appliances inside your home. Use dehumidifiers or install exhaust fans in basements, bathrooms, and laundry rooms to reduce indoor humidity below 50% when possible.
Outside, adjust soil grading to slope away from your foundation at least 6 inches within the first 10 feet to prevent water pooling. Remove or reduce mulch thickness and relocate wood piles away from your house since these create moist hiding spots. Clear gutters and downspouts to direct rainwater away effectively. Steps to reduce moisture include:
- Repair dripping faucets, leaking irrigation lines, or faulty downspouts.
- Ventilate basement and crawl spaces using fans or vents with proper screens.
- Grade soil so water drains away from your foundation.
- Keep mulch less than 2 inches deep and remove it from areas next to your home.
- Store firewood at least 20 feet from your house and improve off the ground.
Reducing moisture helps deter earwigs by removing what attracts them most. Excess moisture indoors often costs more to correct but improves overall home comfort and pest control.
Step 4: Maintain Dry Conditions Year-Round
Maintaining dryness helps prevent earwig reinfestations throughout the year. Inspect your home seasonally, especially before fall when earwigs seek shelter indoors. Regularly check and reapply caulk or weatherstripping as needed. Keep gutters cleaned and ensure that downspouts function properly after heavy rains.
Monitor indoor humidity with a hygrometer and run a dehumidifier during damp seasons if necessary. Also, remove garden debris and excess mulch periodically to prevent new earwig nesting sites near your home. Use this checklist annually:
- Inspect and reseal cracks and gaps around doors, windows, and foundation.
- Clean gutters and examine drainage slopes around your home.
- Check for moisture leaks inside, focusing on basements and laundry rooms.
- Renew weatherstripping and door sweeps as they wear out.
- Clear garden mulch and wood piles regularly and relocate if needed.
Consistent maintenance costs little time and materials but helps keep earwigs out permanently. Neglecting this can lead to recurrent infestations and costly damage to garden plants or interior areas.
Setting and Using Earwig Traps for Easy Capture
You can capture earwigs effectively by setting simple traps that lure them in and prevent their escape. The two most common traps use either a soy sauce and oil mixture or commercially available sticky traps. Both rely on attracting earwigs with scent or surface textures and work best when placed strategically in areas where earwig activity is high.
DIY Soy Sauce and Oil Trap Recipe
One of the easiest and most effective traps to make uses equal parts vegetable oil and soy sauce. The soy sauce attracts earwigs with its strong aroma, while the oil forms a slick surface they cannot climb out of, causing them to drown. To make this trap, fill a shallow container like a yogurt cup or clean tuna can with about 1 to 2 tablespoons of vegetable oil and the same amount of soy sauce. The liquid depth should be approximately 1 to 2 centimeters for best results.
Place the container flush with the soil surface or slightly buried to allow easy access. Earwigs will enter after dusk when they are most active. Let the trap sit for several nights, then dump out the captured insects, refresh the liquid, and reset. This trap is inexpensive and reusable, with materials costing just a few dollars in total.
Using Commercial Sticky or Bait Traps
Sticky traps designed for mice or insects can catch earwigs as they travel along walls, plant bases, or entry points. These traps catch earwigs physically without the need for bait, so they work well in dry conditions or when liquid traps aren’t suitable. Place traps directly on soil near plants or along door thresholds for continuous capture.
Commercial bait traps are also available that combine attractants with adhesive surfaces. These often include specific scents or pheromones targeting earwigs and can capture dozens per night in infestations. While commercial traps cost more than homemade versions, they can save time and offer a cleaner solution without dealing with liquids.
Light-Based Trapping Strategies
Earwigs are nocturnal and generally avoid bright lights, but can be attracted to low-intensity outdoor lighting. Use yellow or amber LED lights around your garden or home to reduce attraction for other pests while minimizing earwig presence. Placing traps near these dim lights can encourage earwigs to approach and enter traps during their peak activity at night.
Contrary to some insects, bright white or blue lights do not significantly attract earwigs. Avoid using strong spotlights as they may push earwigs to hide rather than come out. For trapping, a dark, quiet area with traps positioned near low-level lighting works best.
Placement and Timing Tips for Traps
Effective trap placement depends on identifying earwig hotspots such as around garden beds, flower pots, mulch, or close to foundation walls. Set three to six traps per heavily infested area to increase capture rates. Traps should be placed flush with the ground or slightly buried to help earwigs find and enter them easily.
Earwigs are active primarily at night, especially in cool, moist conditions between 60°F and 75°F, so check traps early in the morning. Leave traps out for at least three to five consecutive nights before relocating or adjusting. Refresh bait in homemade traps every 2 to 3 days for sustained attractiveness.
- Position traps near known hiding spots like under leaves and garden debris
- Use multiple traps to cover different areas of your yard or foundation
- Check and reset traps daily during peak earwig activity seasons (spring through fall)
- Keep traps away from direct sun to prevent bait evaporation and overheating
- Combine trap use with habitat reduction, such as removing damp mulch or wood piles
Strategic trap placement and regular monitoring can reduce earwig numbers significantly by breaking their breeding cycle and limiting their access to your home and garden. Remember that consistent, patient trapping is key for lasting control.
Preparing and Applying Natural Repellents and DIY Sprays
You can use several natural repellents and DIY sprays to control earwigs safely indoors and outdoors. Combining simple ingredients like liquid soap, rubbing alcohol, and certain essential oils makes it easy to create effective treatments that deter or kill earwigs without harsh chemicals. Growing repellent plants nearby also helps reduce their presence naturally.
Homemade Soapy Water Spray Recipe and Usage
A mild soapy water spray is an effective, non-toxic option for discouraging earwigs. The soap breaks down their protective outer layer, causing dehydration and creating an unpleasant environment. This solution works well indoors on plants and surfaces, as well as outdoors in shady garden areas where earwigs hide. To make the spray:
- Fill one gallon of water into a clean spray bottle or garden sprayer container.
- Add one capful (about 1 tablespoon) of gentle liquid soap, such as dishwashing liquid without additives or fragrances.
- Shake or stir the mixture until it’s frothy and well combined.
- Spray directly onto areas where you see earwigs, including baseboards, door thresholds, cracks, and plants.
- Reapply every 3 to 5 days or after rain if used outdoors to maintain effectiveness.
For plants showing signs of earwig damage, lightly mist leaves with the soapy water spray to clean pests off without harming the foliage.
Test the soapy spray on a small section of sensitive plants first to ensure it doesn’t cause leaf damage.
Rubbing Alcohol-Based Spray Preparation
An alcohol-based spray can kill earwigs on contact, offering quicker results than soap alone. Use 70 percent rubbing alcohol diluted with water to avoid harming plants or surfaces. This spray is especially useful for localized indoor infestations or direct treatment of earwigs on plants and patios. Follow these steps to prepare and apply the alcohol spray:
- Mix one part 70 percent rubbing alcohol with ten parts water in a spray bottle.
- Add a squirt of mild liquid soap to increase the spray’s adherence to surfaces.
- Shake the bottle gently to combine ingredients without creating excess foam.
- Spray earwigs directly as well as hiding spots such as cracks, window sills, and under pots.
- Spray any indoor plants affected by earwigs, avoiding saturated coverage to protect delicate leaves.
- Repeat applications every few days during active earwig seasons or infestations.
Avoid overusing alcohol sprays near heat sources or open flames, as rubbing alcohol is flammable.
Natural Plant Repellents to Grow Around Your Home
Planting specific herbs and flowers around your home and garden creates a natural barrier that earwigs find unpleasant. These plants emit scents or contain oils that repel earwigs and other insects without pesticides. Effective repellent plants include:
- Basil
- Lavender
- Rosemary
- Fennel
- Dill
- Anise
- Cinnamon (ground or as part of a mulch)
- Garlic
- Eucalyptus
- Cosmos and tansy flowers
- Cayenne pepper (can be sprinkled as a powder)
- Citrus plants or peels
Consider placing these plants near doorways, windows, and in garden beds where earwigs frequent. You can also dry some herbs and make sachets to place indoors or in crawl spaces.
Keep repellent herbs healthy and trimmed, as strong scents repel earwigs most effectively when plants are fresh.
Applying Repellents Safely and Effectively
Spraying natural repellents or using homemade insecticides requires proper application to avoid damage and maximize results. Outdoors, treat the perimeter of your home, garden beds, and shady, moist areas where earwigs lay eggs or hide.
For indoor use, spray baseboards, corners, under sinks, and around windows to create a barrier. Avoid soaking plants with alcohol sprays to prevent leaf burn. Applying diatomaceous earth around foundations or garden edges can provide a physical barrier that damages earwigs’ exoskeletons, but avoid using it where pets or children play frequently.
After spraying outdoor areas, water lightly to help the solution seep into the soil where earwigs may deposit eggs. Repeat applications every 4 to 7 days or after rainfall to maintain an effective repellant zone. Keep areas dry and free of clutter to reduce earwig hiding spots and improve spray effectiveness.
- Identify earwig hotspots and entry points around your home and garden.
- Apply natural sprays or diatomaceous earth to these locations.
- Water outdoor spray treatments lightly to help penetration without washing away the spray.
- Use sachets or plant repellent herbs near windows and doors.
- Repeat treatments after heavy rain or every few days if facing heavy infestation.
- Avoid spraying when temperatures exceed 85°F to protect plant health.
- Remove or destroy dead earwigs promptly to prevent attraction of other pests.
Wear gloves when handling diatomaceous earth or rubbing alcohol sprays and keep sprays away from pets to avoid irritation or ingestion.
When to Use Commercial Pesticides or Call a Professional
Turning to commercial pesticides or professionals is often best when earwig numbers stay unusually high despite home efforts over one to two weeks. Persistent infestation can signal the need for stronger, targeted treatments that professionals provide, alongside expert advice for safer application. Chemical control should always minimize harm to beneficial insects and pets by using the least toxic effective option applied specifically where earwigs gather.
Granule pesticides formulated for earwigs offer a chemical control method, but these need cautious handling to avoid disrupting your garden’s ecosystem. Beneficial nematodes present a less toxic alternative valuable in moist garden beds; they target earwig larvae underground without affecting other insects or pets. Products like spinosad-based baits can reduce earwig populations if placed correctly, especially in areas with more than seven earwigs caught after one week.
| Treatment Method | Effectiveness | Safety Considerations | Typical Cost Range | Notes |
|---|---|---|---|---|
| Granule Pesticides | Moderate to High | Risk to beneficial insects; use directed application only | $15, $40 per treatment | Applied where earwigs hide; follow label strictly |
| Beneficial Nematodes | Moderate (best as prevention) | Non-toxic to pets and birds; ineffective when soil is dry | $20, $50 per application | Pros at controlling soil-dwelling stages; needs moist soil |
| Spinosad Baits | High if positioned properly | Relatively safe; avoid exposure to pollinators | $10, $30 per bait pack | Deploy near high catch zones; monitor weekly |
| Professional Treatment | High | Professionals use safer, pro-grade products | $150, $300 per service | Recommended for severe or persistent infestations |
Watch the earwig activity after treatment: good results mean a noticeable drop in catches within 7 to 10 days. If earwigs persist or spread indoors, consider escalating your approach. Keep an eye on changes in earwig presence, especially during fall, when they seek shelter inside. Early signs of re-infestation could justify professional evaluation and tailored solutions.
Contacting a licensed exterminator ensures treatments meet local regulations and helps protect your family and garden’s health. A pest control professional offers access to products that aren’t sold to the public and expertise to apply them while preserving beneficial wildlife, like the American toad, which naturally eats many earwigs nightly.
Manual Removal, Damage Prevention, and Garden Protection
Vacuuming and physically removing earwigs can reduce their numbers quickly, especially indoors or in contained garden spots. Using a vacuum with a hose attachment lets you reach tight, dark places where earwigs hide during the day. This method helps limit their presence without using chemicals, which is ideal for homes and sensitive plants. To protect fruit trees and garden plants, physical barriers and habitat modification work best alongside removal. Shielding bark crevices and removing fallen fruit limits food and shelter, discouraging earwigs from settling on your trees or plants. To manually remove earwigs and protect your plants properly, follow these steps:
- Use a handheld vacuum: Early morning is ideal since earwigs are less active. Run the vacuum nozzle over baseboards, corners, and garden debris where earwigs cluster.
- Empty the vacuum bag or canister: After each use, securely dispose of the contents outside to prevent re-infestation.
- Set up upturned flower pots or inverted cans filled with hay: Place these traps on canes or stakes near fruit trees and garden beds to lure earwigs looking for shelter.
- Remove earwigs from traps daily: Shake traps into soapy water every morning to kill the caught insects. Avoid doing this if you are encouraging earwigs to protect fruit trees, as some gardeners consider them beneficial in this case.
- Clear fallen fruit and garden debris regularly: This eliminates food sources and hiding spots, making your garden less attractive to earwigs.
- Wrap tree trunks with sticky barriers or horticultural tape: These prevent earwigs from climbing up and damaging leaves or fruit.
- Use beneficial nematodes: Apply products containing Steinernema carpocapsae to the soil around affected plants. These microscopic organisms target earwigs and reduce their populations safely.
- Encourage natural predators like birds: Plant berry bushes or install bird feeders to attract insect-eating birds that keep earwigs under control naturally.
Manually removing earwigs lowers their numbers immediately but requires consistency since earwigs reproduce rapidly. Trapping and clearing debris are low-cost techniques suitable for gardeners focused on non-chemical control. Using sticky bands on tree trunks costs about $5 to $10 per roll and protects young fruit trees effectively. Beneficial nematodes typically cost $15 to $30 per application but last several months. Always reapply nematodes if heavy rain occurs soon after treatment to maintain effectiveness.
Physical removal and plant protection methods rarely harm beneficial insects or the plants themselves. Their biggest limitation is the labor involved and the need for repeated action during warm months when earwigs are most active. These techniques work especially well when combined as part of a garden-wide approach to keep earwig damage to seedlings, flowers, and fruit minimal.
Avoiding Common Treatment Mistakes and Maintaining Long-Term Control
Common mistakes when trying to get rid of earwigs include ignoring moisture issues, failing to eliminate hiding spots, and not monitoring the problem regularly. Earwigs thrive in damp areas and clutter, so leaving leaf piles, mulch, or wet debris near your foundation only encourages their return. Another error is relying on one treatment method without follow-up, which often means the infestation resurfaces.
Avoid attracting earwigs by keeping your yard clean and dry. Trim back dense vegetation near the house, store firewood away from walls, and repair leaking faucets or irrigation systems to reduce moisture. Seal cracks and gaps where earwigs might enter. These steps remove shelter and food sources, cutting down the chances of reinfestation. Setting up a maintenance and monitoring calendar helps keep your efforts on track. Here is a recommended routine:
- Weekly: Check and replace earwig traps or natural baits, such as rolled-up newspapers, to catch any lingering or new pests.
- Monthly: Inspect mulch depth and compost areas; keep layers shallow and dry to reduce breeding sites.
- Seasonally: Clean gutters, remove debris near the foundation, and reseal any cracks or openings.
- Annually: Schedule a professional pest inspection if earwig activity persists or if you notice new damage.
Replace earwig traps or damp newspaper shelters every 1 to 2 days to prevent mold buildup and maintain their effectiveness.If earwigs stick around after weeks of treatment, it’s time to reassess your strategy. Increase sanitation measures and consider combining traps with natural repellents or a professional pest control service, especially for severe infestations. These cases might require targeted pesticide application under expert supervision.
Completely eliminating earwigs usually takes a few weeks to a couple of months, depending on infestation size and treatment consistency. Patience and persistence pay off. Regularly monitoring and maintaining your home’s perimeter and garden conditions ensures that earwigs don’t get a chance to return.
Step-by-Step Action Plan to Get Rid of Earwigs
Follow these clear steps to identify, remove, and prevent earwigs from invading your home and garden effectively and safely.
- Day 1: Identify and Inspect, Check for earwig signs inside and outside your home, focusing on damp areas and garden debris. Confirm success by spotting no new earwigs after a thorough search.
- Day 2: Seal Entry Points, Use caulk or weatherstripping to close cracks, gaps, and holes where earwigs enter. You’ll know it works when fewer earwigs appear indoors over the next few days.
- Day 3: Set Traps, Place rolled-up newspapers, cardboard tubes, or store-bought traps in shaded outdoor spots. Check back overnight for captured earwigs, showing the traps’ effectiveness.
- Week 1: Apply Natural Repellents, Spray mixtures like diluted neem oil or garlic extract around entry points and garden plants. Reduced earwig activity after a few days indicates the repellents are working.
- Week 2: Manual Removal and Garden Cleanup, Remove piles of mulch, leaf litter, and damp wood where earwigs hide. Notice fewer earwigs in these cleaned areas and less plant damage.
- Week 3: Monitor and Repeat Treatments, Keep inspecting and resetting traps weekly. Reapply repellents when earwig presence returns to keep numbers low.
- After 1 Month: Consider Professional Help if Needed, If earwig numbers remain high despite your efforts, consult a pest control professional for targeted treatment.
Frequently Asked Questions
What Is the Quickest Way to Get Rid of Earwigs in My Garden?
DIY traps like rolled wet newspaper or oil-filled pitfall cups are fast, effective options. They attract earwigs overnight, making it easy to remove large numbers without chemicals or heavy labor.
Can Sealing Entry Points Alone Stop Earwigs from Entering My Home?
Sealing helps reduce entry but usually won’t stop earwigs if moisture and food sources remain inside. Combine sealing with humidity control and removing attractants for best results.
Are Earwigs Harmful to Humans or Pets?
Earwigs are not harmful to humans or pets and do not spread disease. They can pinch but rarely bite or cause lasting harm.
How Can I Maintain Low Humidity to Prevent Earwigs Indoors?
Use dehumidifiers and fix leaks to keep indoor humidity below 60%. This makes your home less attractive and less hospitable to earwigs.
What Natural Repellents Work Best Against Earwigs?
Garlic and neem oil sprays can repel earwigs when applied around plants and doorways. Fresh applications after rain improve their effectiveness.
Will Removing Outdoor Debris Reduce Earwig Populations Significantly?
Yes, clearing leaf litter, mulch, and piles of wood limits earwig hiding places, reducing their numbers near your home and garden.
Wrapping Up
Getting rid of earwigs starts with regular inspection and sealing cracks around your home to block their access. Today, set a few traps in damp, shady spots near your foundation to catch the initial wave and reduce their numbers. Keeping up with these simple steps makes it easier to maintain a pest-free garden and home all season long.



One Comment