

How to Get Rid of Spider Mites: 8 Proven Steps for Healthy Plants
To get rid of spider mites effectively, start by identifying their presence early and removing infested leaves or plants promptly. Use insecticidal soaps, oils, or targeted sprays like liquid sulfur, and apply treatments on a regular schedule to break their life cycle. You can also introduce natural predators and maintain good plant care practices to prevent re-infestation.
This information is for home gardeners and plant owners facing spider mite problems. You’ll learn how to spot mites and their damage, understand their biology, compare treatment options, and know when to discard infected plants safely to keep your indoor or outdoor garden healthy.
Key Takeaways
- Identify spider mites by spotting tiny, moving dots often with two spots on their backs, mainly on plant leaf undersides.
- Look for fine webbing, leaf yellowing, and speckled damage on plants like tomatoes and houseplants prone to spider mite attacks.
- Spider mites reproduce in 5 to 8 days; understanding this rapid cycle helps time treatments to stop infestation growth.
- Use insecticidal soaps, oils, or a 70% rubbing alcohol solution carefully, repeating application every 5 to 7 days for effectiveness.
- Spray thoroughly, focusing on leaf undersides, and repeat treatments weekly to target new larvae before they mature.
- Introduce natural predators or use water sprays to reduce spider mite populations safely and reduce chemical use.
1. How to Identify Spider Mites and Confirm Infestations

Spider mites are tiny arachnids, often less than 1 millimeter in size, that feed on plant sap and cause significant damage if left unchecked. They are also known as webspinning mites, named for the fine, silk-like webs they produce on infested plants. Spotting these pests early is essential to prevent an infestation from spreading and harming your plants.
Identifying spider mites can be tricky because of their microscopic size and tendency to hide on the undersides of leaves. Unlike insects, spider mites have eight legs and move very quickly when disturbed. To confirm you have spider mites rather than another pest, you need to look for specific signs and use tools that help you see them clearly. Here is a step-by-step checklist to identify spider mites and differentiate them from other pests:
- Inspect the undersides of leaves: Use a handheld magnifier with at least 10x magnification to look closely at the leaf undersides where spider mites like to feed and reproduce.
- Check for minuscule crawling spots: Notice tiny specks in colors like yellow, red, green, or brown moving around. These are spider mites, usually no bigger than the dot at the end of this sentence or even smaller.
- Check for fine webbing: Confirm the presence of spiders by spotting their characteristic silk webs, especially around leaf joints and along leaf veins.
- Perform the white paper test: Hold a sheet of white paper under the leaves and tap the plant gently. Tiny specks falling onto the paper, especially if they move, indicate you likely have spider mites.
- Compare damage patterns: Look for stippling or tiny yellow or white spots on leaves, indicating sap-sucking activity, which is typical of spider mites versus chewing pests.
- Exclude other pests: Make sure you’re not confusing spider mites with aphids, thrips, or whiteflies by noting differences in size, movement, and the presence or absence of webbing.
- Repeat inspections regularly: Check your plants at least twice a week, particularly during dry, hot weather, which favors spider mite outbreaks.
- Document findings: Take photos or videos to track infestation progress and assist with professional pest identification if needed.
Using a magnifier and the white paper tap test are practical and low-cost methods to detect spider mites early. Doing this regularly, especially on susceptible plants, helps confirm infestations versus other pests. Upon confirming spider mites, promptly remove heavily infested leaves or plants to prevent the spread. Avoid composting infested material to reduce re-infestation risk.
2. Recognizing Spider Mite Damage and Susceptible Plants
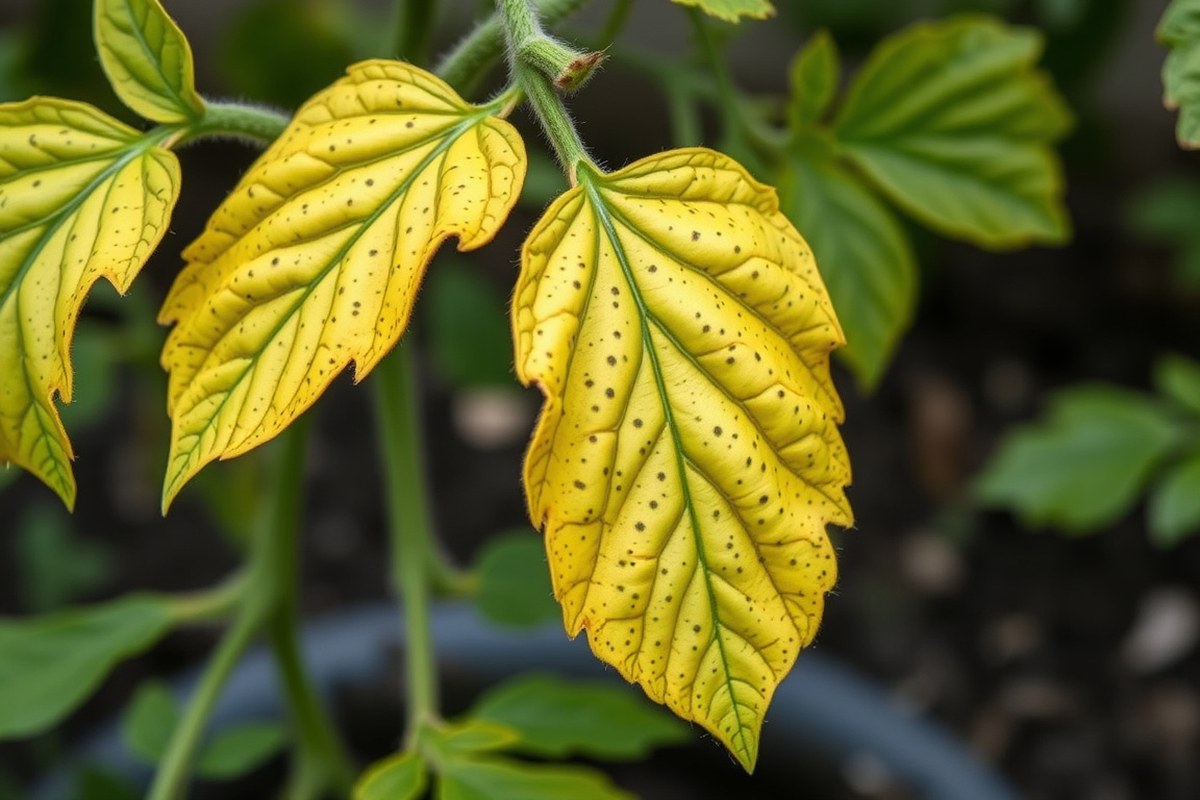
Spider mite damage shows up primarily as leaf discoloration, tiny speckles, and fine silky webbing that covers leaves and stems. Many popular indoor and outdoor plants are at risk, especially in warm, dry environments. Spider mites mainly feed on the leaves but can sometimes be found in soil, contributing to ongoing plant stress.
Identifying Leaf Discoloration Patterns
Spider mites feed by piercing leaf cells to suck out sap, which removes chlorophyll and causes distinct damage. Early signs include a stippled or speckled look on leaves, where tiny pale or yellow dots replace the healthy green color. This spotting usually starts on the undersides before spreading across the entire leaf surface.
As the infestation worsens, leaves may turn bronze, yellow, or gray and eventually become dry and brittle. Affected plants also experience leaf loss and stunted growth due to this damage. Knowing what to watch for helps you spot them before serious harm occurs.
Detecting Fine Webbing on Plants
One of the most telling signs of spider mites is the presence of very fine, silken webbing spun over leaves and stems. This webbing appears like a delicate net and protects the mites while they feed and reproduce. In severe infestations, the webbing can cover entire plant parts, making the damage unmistakable.
Inspection should focus on the undersides of large leaves and along stems where spider mites tend to concentrate. The webbing also traps dust and may collect moisture, which worsens plant stress. Removing affected plant parts often includes cutting out web-covered leaves.
Common Houseplants Prone to Infestation
Spider mites prefer plants that thrive in bright light with large leaves and dry conditions. Several common indoor plants are especially vulnerable to these pests. Monitoring these species closely increases your chances to catch infestations early.
- Alocasia
- Calathea
- Philodendron
- Ficus species
- Spider plants (Chlorophytum comosum)
- Dracaena
- English ivy
These plants are typically more sensitive to water stress, which makes them more attractive to spider mites seeking moisture. Regularly cleaning dust from their leaves helps reduce the risk.
Outdoor Garden Plants at Risk
Garden plants often attacked by spider mites include many vegetables, fruit trees, and ornamentals. Spider mites feed on leaves, reducing plant health and sometimes leading to lower fruit and vegetable yields. Certain flowering shrubs also show visible spotting and webbing when infested.
| Plant Type | Examples |
|---|---|
| Vegetables & Fruits | Tomatoes, Peppers, Beans, Strawberries |
| Ornamental Flowers | Roses, Hydrangeas, Impatiens |
| Fruit Trees & Vines | Apples, Grapes, Berries |
Spider mites reduce photosynthesis by damaging leaf tissue, which stresses the plants and lowers quality. Watching for leaf spotting and webbing early in the growing season can prevent widespread damage.
Environmental Conditions Favoring Mites
Warm, dry conditions strongly favor spider mite populations since these pests seek moisture in plant leaves. Indoor environments heated during winter or outdoor plants in full sun with low humidity are particularly susceptible. Lack of adequate watering or dusty foliage can increase risk as well.
Managing humidity around vulnerable plants and keeping leaves clean can slow mite development. This is important because spider mites reproduce rapidly in favorable conditions, leading to an infestation within weeks.
Keep new plants isolated for at least 30 days before introducing them to your collection to avoid spreading spider mites.
3. Understanding Spider Mite Biology and Life Cycle for Better Treatment
Spider mites reproduce at a rapid pace, completing their life cycle from egg to breeding adult in as little as 5 to 8 days. This means that an infestation can grow very quickly if not addressed promptly. The eggs hatch in about three days, and young mites can start laying eggs within a week, which causes populations to multiply exponentially. Because eggs are often resistant to treatments, you must plan to reapply any control method multiple times, typically every 5 to 7 days, to catch newly hatched mites before they start reproducing.
Understanding this fast life cycle is critical to successful spider mite treatment. For example, insecticidal soaps and natural sprays generally do not kill eggs. Repeating treatment at 5-day intervals ensures that each new generation is targeted before it can lay more eggs, gradually reducing the population. Neglecting reapplication gives the mites a chance to rebound, making treatments much less effective and prolonging the infestation.
Environmental conditions also play a big role in how quickly spider mites spread. They thrive in dry, warm weather, with temperatures around 80 degrees Fahrenheit being optimal. These conditions are most common during the summer months, especially from July through September, which often coincides with when spider mite infestations emerge or worsen. Low humidity and hot indoor climates can create perfect breeding grounds on many indoor and outdoor plants.
To help slow spider mite growth, keep humidity moderately high around your plants by misting regularly or using a humidifier, especially during dry seasons. Water-stressed plants are more vulnerable, so maintaining consistent soil moisture without overwatering helps prevent infestations. Also, inspecting and isolating new or nearby plants can prevent spider mites from spreading quickly. Since spider mites are microscopic and often unnoticed until damage appears, frequent plant checks during warm months are important.
In some gardening situations, the use of predatory mites, which feed on spider mites, can be an effective natural control method. These predatory mites require similar environmental conditions and can reduce spider mite populations rapidly when introduced under the right circumstances. However, chemical insecticides often harm these beneficial insects and can inadvertently cause spider mite outbreaks.
Applying these principles requires diligence and timing. Begin treatment as soon as you detect spider mites and repeat every 5 to 7 days until no new signs of infestation appear. Keep plants well-watered and humid, especially in warmer months, to create less favorable conditions. Monitoring closely and acting fast can prevent a small problem from turning into a severe infestation.
4. Comparing Spider Mite Treatment Options: Soaps, Oils, Alcohols, and Chemicals
Several treatment options target spider mites effectively, including insecticidal soaps, horticultural oils like neem oil, rubbing alcohol solutions, and chemical pesticides. Choosing the right method depends on your plant type, infestation severity, safety concerns, and cost considerations.
Insecticidal soaps and horticultural oils work by smothering spider mites and are generally safe for many plants. Neem oil, a natural extract from the neem tree, both kills spider mites and acts as a repellent. Rubbing alcohol at the right dilution can be a quick, affordable kill method but requires careful application to avoid plant damage. Chemical pesticides like Polysect offer control, but their safety for beneficial insects and resistance development should be considered.
| Treatment | How to Use | Dilution/Concentration | Frequency | Pros | Cons | Cost Approx. |
|---|---|---|---|---|---|---|
| Insecticidal Soaps | Spray thoroughly on all plant surfaces until wet | Ready-to-use or follow product label, usually 1-2% | Every 4-7 days until control | Safe for most plants, effective on motile mites | Does not kill eggs, may burn sensitive plants in hot weather | $10-$15 per quart |
| Neem Oil | Mix with water and a mild soap, spray on leaves (undersides too) | 2% neem oil solution (about 2 tsp per quart water) | Every 7-14 days; may be used preventively | Kills mites and repels, natural and safe | Does not destroy eggs; avoid use in direct sunlight or high heat | $12-$20 per quart |
| Rubbing Alcohol | Mix 1 cup 70% isopropyl alcohol with 4 cups water, spray on plants | ~14% alcohol solution | Repeat every 3-5 days until mites gone | Fast kill of spider mites, inexpensive | May damage sensitive plants; test first; not for continuous use | Under $1 per application |
| Chemical Pesticides (e.g., Polysect) | Follow label instructions carefully for mixing and spraying | Varies by product | As per label, often repeated in 7-10 days | Effective on resistant mite populations | May harm beneficial insects; potential resistance; requires safety gear | $15-$30 per bottle |
Applying insecticidal soap or neem oil works best when you cover the entire plant, especially leaf undersides, since spider mites tend to hide there. Avoid treatment during the hottest time of day to prevent leaf burn. Repeat sprays are necessary because these methods do not destroy eggs.
To use rubbing alcohol safely, always dilute it with water, too strong a concentration can damage your plants. Test on a small area before full application. Avoid alcohol sprays under intense sun or temperatures above 85°F to reduce risk of foliar damage.
Chemical pesticides should be a last resort and used cautiously. Wear protective clothing and follow product instructions exactly. Consider the environmental impact and potential buildup of pesticide resistance. Professional guidance can help with severe infestations.
5. Effective Application and Treatment Schedule to Break Mite Life Cycle
To control spider mites effectively, prepare sprays carefully and apply them fully, then repeat treatments every 5 to 7 days for several weeks to disrupt the mites’ life cycle. Homemade and commercial insecticidal soap sprays work well when applied thoroughly to all plant surfaces. Consistent reapplication is essential to manage newly hatched mites and avoid reinfestation.
Preparing Insecticidal Soap Sprays
Commercial insecticidal soaps provide a ready-to-use option that is safe and formulated for plants. For homemade sprays, select mild liquid dish soap free of degreasers and fragrances to avoid harming plants. Mix soap with water at a ratio of 1 to 2 teaspoons of soap per quart (32 ounces) of warm water. Neem oil or horticultural oil can be combined at label rates to boost effectiveness while maintaining safety. Here are common homemade spider mite spray recipes:
- 1 tsp mild dish soap + 1 quart warm water
- 1 tsp dish soap + 1 quart water + 2 tbsp neem oil (shake well before use)
- 2 tsp insecticidal soap concentrate diluted per label instructions with water
Applying Treatments Safely and Effectively
Thorough coverage of the plant’s upper and lower leaf surfaces is key to killing spider mites on contact. Spray during early morning or late afternoon to avoid leaf burn. Use a spray bottle or hose-end sprayer to apply evenly, ensuring you wet all areas including stems and undersides of leaves. Avoid applying during the hottest part of the day or if rain is expected within 24 hours. Steps for effective application:
- Shake or stir your prepared spray thoroughly to mix ingredients.
- Test a small area of the plant first to check for sensitivity or damage.
- Spray all plant surfaces, aiming for full coverage especially under leaves.
- Allow plants to dry without rinsing off the spray.
- Repeat application every 5 to 7 days to target new mite eggs and nymphs.
- Monitor plants daily for new mites or damage signs.
Do not apply insecticidal soaps in direct midday sun or at temperatures above 85°F to prevent leaf burn or damage.
Scheduling Reapplications to Interrupt Life Cycle
Spider mites reproduce quickly, with eggs hatching in 3 to 5 days. Applying soap sprays once will only kill active mites, leaving eggs untouched. Treating every 5 to 7 days for at least three to four weeks targets mites as they hatch and reduces population significantly.
Use a calendar or reminder system to schedule these repeat applications consistently. For example, treat on day 1, day 7, day 14, and day 21, then assess. If mites remain, continue weekly treatment until no mites are observed for two consecutive weeks. Rotate insecticides if using chemicals to prevent resistance.
| Day | Action |
|---|---|
| 1 | Initial treatment with soap spray |
| 7 | Second application, targeting hatchlings |
| 14 | Third application to catch late hatchlings |
| 21 | Fourth application, continue until mite-free |
| 28 and beyond | Weekly treatments if mites persist |
Consistency in the treatment schedule is necessary; missing applications can allow mite populations to rebound quickly.
6. Using Natural Predators and Water Sprays for Biological Spider Mite Control
Biological control uses natural predators to keep spider mite populations in check, which helps reduce pesticide use and protects beneficial insects. Predatory mites such as Phytoseiulus persimilis, Neoseiulus californicus, and Galendromus occidentalis are among the most common and effective natural enemies for spider mites. These predators feed on spider mites and can establish themselves on your plants, providing ongoing control. You can purchase them online or at specialty garden centers, typically costing around $20 to $40 for several hundred predators. Release them during early infestation stages, placing the predators on the undersides of leaves where spider mites congregate. Keep in mind that avoid using broad-spectrum insecticides after releasing predators, as these can kill beneficial mites and interrupt control.
Beneficial nematodes, microscopic soil organisms, also contribute to biological control by attacking spider mite eggs and pupae in the soil. They require moist soil to survive but cause no harm to your plants. Introduce nematodes when soil moisture is maintained regularly, especially around perennial plants or fruit trees that spider mites favor.
Alongside predators, water sprays help physically remove spider mites from plants. A strong jet of water aimed at the leaf undersides flushes out many spider mites, reducing numbers without chemicals. Use a hose nozzle set to a medium or hard spray, avoiding delicate spray settings that won’t dislodge pests effectively. Spray should be repeated every three days for 2 to 3 weeks or until you see a noticeable drop in mite activity. Consistency is important because spider mites reproduce quickly, and missed individuals can re-establish the infestation.
For a gentle DIY spray, combine ½ cup of starch or flour with ½ cup of milk in 1 gallon of water. This mixture helps suffocate spider mites on contact when sprayed thoroughly on affected leaves. Test this spray first on a small plant area to check for sensitivity before wider application. Avoid spraying during the heat of the day to prevent leaf burn, instead apply in early morning or late afternoon when temperatures are cooler.
- Purchase predatory mites from reputable suppliers with clear release instructions
- Release predatory mites only after confirming spider mite presence to ensure they survive
- Use hose sprays with medium to hard pressure focused on leaf undersides
- Repeat water sprays every 3 days for consistent control
- Mix ½ cup of starch or flour and ½ cup of milk in 1 gallon of water for a natural spray
- Apply sprays early or late in the day to avoid heat stress on plants
- Maintain regular plant watering to reduce drought stress, which encourages spider mite outbreaks
Natural predators can establish long-term control by reproducing alongside spider mites without ongoing additions, providing non-chemical balance. Water sprays reduce the pest load quickly and safely, preventing damage while helping predators do their job. Too weak or infrequent sprays may not remove enough mites, allowing populations to rebound. Avoid harmful pesticides that can destroy natural enemies and instead focus on integrating these biological and physical controls for effective spider mite management.
7. Preventing Spider Mite Infestations with Plant Care and Quarantine
Preventing spider mite infestations starts with good plant care and controlling the environment. Spider mites thrive in hot, dry conditions, so maintaining higher humidity levels around your plants can reduce their chances of appearing. Keep indoor humidity between 40% and 60%, and regularly mist outdoor plants during dry spells. Proper plant spacing improves air circulation, making the environment less inviting for mites and helps you spot early signs. Space plants at least 12 to 18 inches apart for small pots and even more for larger beds. Crowded plants trap heat and moisture, creating optimal conditions for spider mite outbreaks.
Quarantining new plants is important to avoid introducing spider mites to your existing collection. Isolate new plants for at least two weeks in a separate room or area. During this time, inspect leaves, stems, and soil closely every 2 to 3 days using a magnifying glass to spot mites or fine webbing. Early detection during quarantine allows you to treat affected plants before they join the others. Remove any infested soil and consider applying a gentle miticide or insecticidal soap as a precaution.
- Keep humidity between 40% and 60% for indoor plants
- Space plants 12 to 18 inches apart to improve airflow
- Quarantine new plants for a minimum of two weeks
- Inspect quarantined plants every 2 to 3 days for mites
- Use sticky paper traps around pots to catch migrating spider mites
- Remove and dispose of plants with severe soil infestations
- Increase monitoring frequency during summer months, especially in warmer climates
Season and geographic location influence how often you should monitor plants. In warmer climates or during hot, dry seasons, spider mite populations multiply more quickly. Increase inspection frequency to every week from early spring to late fall. In cooler or more humid regions, monthly monitoring may suffice except during summer heat waves. Ongoing monitoring means regularly checking the undersides of leaves and soil surface for mites and their eggs. Use a fine paintbrush or a damp cloth to wipe leaves if you detect early signs, then apply treatment promptly to prevent spread.
Healthy plant care routines including proper watering, feeding, and pruning also support prevention. Avoid over-fertilizing, which can make plants more attractive to spider mites. Removing dust from leaves improves plant health and reduces hiding spots for mites. Finally, consider companion planting with species that repel spider mites, such as onions, rhubarb, or asters, to naturally deter infestations outdoors.
8. When to Discard Spider Mite-Infested Plants and Safety Precautions
Discard the plant when spider mites have severely damaged over 50% of its leaves or repeated treatments fail to show improvement after two weeks. Lower damage levels usually justify ongoing treatment, especially for valuable or rare plants. Always isolate infested plants and follow safety steps to avoid spreading mites and harming yourself or other plants.
Assessing Infestation Severity
Check how widespread the damage is by examining the leaves for yellowing, stippling, and webbing. More than half the leaves visibly affected or a decline in the plant’s overall health despite treatment indicates a severe infestation. Consider whether the plant is valuable, sentimental, or easily replaceable. For common or inexpensive plants with over 50% damage, disposal is often the best solution. Save treatment efforts for plants showing less damage or signs of recovery.
Repeat treatment attempts for at least two weeks, monitoring mite activity closely. No reduction in mite numbers or worsening damage calls for discarding the plant to limit the risk of spreading mites to other plants in your garden or home.
Safe Removal and Disposal Methods
Removing and disposing of spider mite-infested plants safely prevents further contamination of your collection or garden. Avoid composting infested plant material because mites can survive and spread. Instead, discard the plants in sealed plastic bags to contain the pests. Follow these steps for safe removal and disposal:
- Isolate the affected plant immediately to prevent mite transfer to other plants.
- Trim off poorly damaged leaves and twigs to reduce mite habitat.
- Wear disposable gloves to protect your skin from irritants in treatment products or plant debris.
- Carefully place the entire plant or severe trimmings into a sturdy plastic bag.
- Seal the bag tightly to trap mites inside.
- Dispose of the sealed bag in the regular trash instead of yard waste or compost.
- Disinfect pruning tools with rubbing alcohol or a 10% bleach solution to kill any mites or eggs.
- Wash hands and clothing thoroughly after handling infested material.
Tip: Avoid burning infested parts as smoke can harm nearby plants and may not reliably kill all mite life stages.
Avoiding Treatment Mistakes and Plant Damage
Soaps, oils, and chemical treatments work best when you follow label instructions closely and consider plant type and weather conditions. Overusing or applying treatments during hot, sunny days can cause leaf burn or stress plants, making infestations harder to control. Always test treatments on a small leaf patch first.
Common mistakes include applying products too frequently, mixing incompatible chemicals, or treating outside recommended temperature ranges (usually between 50°F and 85°F). Plants weakened by drought or nutrient deficiencies are more sensitive to treatments and less able to recover from mite damage, so improve overall plant health concurrently.
Timing treatments in cooler parts of the day such as early morning or late afternoon reduces plant stress and improves control effectiveness. Avoid spraying water-sensitive plants aggressively, as excess moisture can promote fungal diseases that complicate recovery from spider mites.
Step-by-Step Action Plan to Get Rid of Spider Mites
Follow these steps to quickly identify and control spider mite infestations, protect your plants, and prevent future problems.
- Before You Start: Inspect plants closely for tiny moving dots or fine webbing, especially on undersides of leaves, to confirm spider mite presence. Use a magnifying glass if available. Clear identification lets you act precisely.
- Day 1: Remove heavily infested leaves or plants that show severe damage with yellow or stippled leaves. This limits spreading. Watch for fresh damage over the next few days as a sign infestation persists.
- Day 1, 3: Apply insecticidal soap, neem oil, or horticultural oil evenly to all foliage, focusing on undersides. Repeat every 3-4 days. Success means fewer live mites and less new leaf damage.
- Week 2: Use a vigorous spray of water on plants twice weekly to physically remove mites and their webs. Continue alongside treatments. Reduced mite sightings and webs show this is working.
- Week 3: Introduce natural predators like ladybugs or predatory mites if feasible, especially in outdoor or greenhouse settings. Predators keep mite populations low over time, evident by fewer mites without chemical use.
- After Treatment: Quarantine new plants for at least two weeks before introducing them near others. Maintain proper plant care, moderate watering and humidity, to discourage mite outbreaks. Healthy plants show no new mite damage.
- Ongoing: Monitor plants weekly for signs of mites or damage. Repeat treatments or predator releases as needed. Early detection keeps infestations manageable without drastic measures.
Frequently Asked Questions
What Is the Fastest Way to Get Rid of Spider Mites?
The quickest method is to spray plants with insecticidal soap or neem oil. Repeat every 5-7 days to catch newly hatched mites and fully break their life cycle.
Can Washing Plants with Soap and Water Eliminate Spider Mites?
Yes, a soap and warm water solution can effectively remove spider mites. It physically smothers them and is a safe way to clean indoor plants regularly.
Should I Remove and Discard Heavily Infested Plant Parts?
Removing and discarding leaves or plants with heavy mite infestations is important to prevent spreading. Avoid composting them to reduce the risk of reinfestation.
Can Liquid Sulfur Treat Spider Mite Infestations?
Spraying liquid sulfur can help control spider mites, especially outdoors. Use it carefully following label instructions, as it may harm sensitive plants or beneficial insects.
Is It Effective to Increase Humidity to Control Spider Mites?
Raising humidity can reduce spider mite populations since they prefer dry conditions. Misting plants or using a humidifier can slow their growth but won’t eliminate them alone.
Do Natural Predators Completely Solve Spider Mite Problems?
Natural predators like ladybugs help reduce mites but rarely eradicate them entirely. Use alongside other treatments for better control.
Final Thoughts
Getting rid of spider mites requires consistent attention to your plants and timely treatments to interrupt their life cycle. Start by inspecting your most vulnerable plants closely for signs of mite activity and damage. Today, set a reminder to gently spray your susceptible plants with water to wash away mites and help prevent infestation before it starts.





One Comment