How to Get Rid of Mealybugs: 8 Proven Steps for Complete Control
To get rid of mealybugs, start by isolating the affected plant and removing visible pests with 70% or less isopropyl alcohol. Follow this by spraying insecticidal soap or neem oil every 7 to 10 days, covering all leaf surfaces until no mealybugs appear for three to four weeks. This routine targets all life stages and prevents reinfestation. Check roots regularly, especially with succulents, and discard any infested plant cuttings immediately to stop the spread.
Gardeners and houseplant owners looking for effective, safe ways to control mealybugs will find clear identification tips, life cycle insights, and proven treatment methods here. You’ll also learn how to prevent mealybugs from returning and monitor your plants to maintain long-term health and pest-free growth. The article compares treatment options and offers troubleshooting advice to help you achieve complete control.
Key Takeaways
- Inspect succulents’ roots every three months for white cottony masses to catch root mealybugs early during treatment.
- Kill visible mealybugs on contact by dabbing with 70% or lower isopropyl alcohol using a cotton swab.
- Spray insecticidal soap or neem thoroughly every 7 to 10 days until no mealybugs appear for 3 to 4 weeks.
- Keep affected plants separate and maintain treatment for a minimum of 8 weeks following the final observation to ensure all eggs that hatch are removed.
- Lower indoor nighttime temperatures to around 60°F to deter mealybugs, which prefer warmer, tropical conditions.
- Avoid spraying insecticides in temperatures above 90°F or direct sun to prevent plant damage and ensure treatment safety.
1. What Are Mealybugs and Why Are They Harmful?

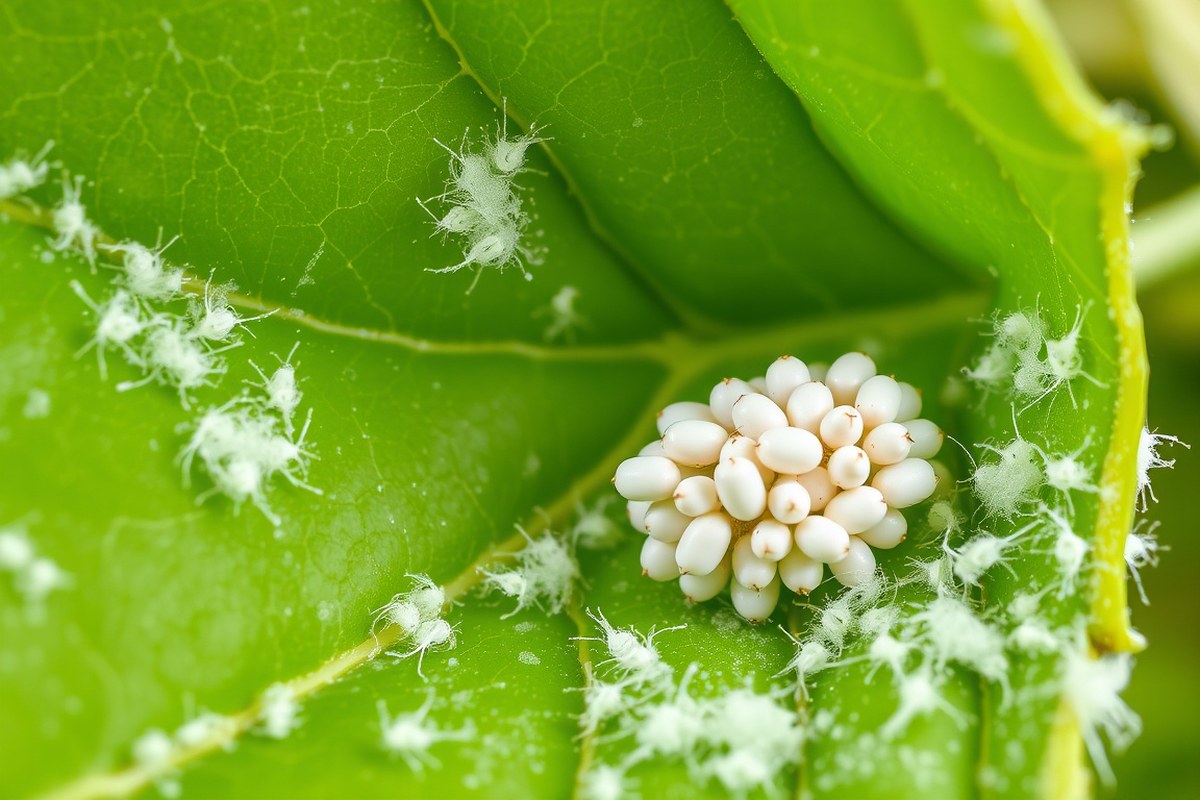
Mealybugs are small, soft-bodied insects covered with a white, powdery wax that resembles cotton. These pests feed by piercing plant tissue and sucking out the sap, which weakens your plants over time. This sap extraction causes yellowing leaves, stunted growth, and can lead to leaf drop or even plant death if the infestation gets severe. Mealybugs also excrete a sticky substance called honeydew, which encourages the growth of sooty mold on your leaves, further harming the plant’s ability to photosynthesize.
These insects affect a wide range of plants, both indoors and outdoors, particularly favoring warmer climates where temperatures often exceed 60°F. Indoor houseplants like hoyas, philodendrons, and schefflera are common targets, while outdoor plants including citrus, grapes, and various ornamentals also suffer. Different mealybug species prefer different hosts, some live on the surface, while others, like ground mealybugs, infest the soil around potted plants, making detection harder.
The threat mealybugs pose largely depends on their ability to reproduce quickly and hide. They often cluster on leaf undersides, stems, and even root zones for soil-dwelling types. Early infestation signs are usually small clusters of the cottony substance and slight leaf damage. If you find just a few mealybugs, isolate the affected plant immediately to prevent spread and remove visible bugs with a cotton swab dipped in 70% isopropyl alcohol. This physical removal helps reduce their numbers without risking chemical damage.
Isolating the plant matters because mealybugs spread easily through contact. They prefer temperatures between 70°F and 85°F, so lowering nighttime indoor temperatures to around 60°F can slow their activity on tolerant houseplants. Outdoor treatments should be applied on cooler, shady days below 85°F to avoid leaf burn from sprays. Mealybugs are notoriously hard to eradicate with a single treatment since eggs and small crawlers might remain hidden. You need to spray insecticidal soap or neem oil thoroughly every 7 to 10 days, including leaf undersides, until no signs appear for 3 to 4 weeks. This repetition ensures targeting multiple life stages.
Some plants are more prone to infestation because mealybugs prefer thick, waxy, or tropical foliage. Potted tropicals and succulents, for example, are often hit hardest. In outdoor settings, completely removing heavily infested plants sometimes becomes necessary, as mealybugs can persist despite treatment efforts. For vegetables and ornamentals, using recommended insecticides formulated for those plants can control mealybugs without damaging delicate leaves.
2. How to Identify Mealybug Infestations on Leaves and Roots

Mealybugs appear as small, white, fuzzy insects clustered on your plants, commonly found at leaf axils, stem joints, and roots. Different life stages vary in size and mobility but maintain that cottony look, aiding identification. Checking roots, especially on succulents, requires careful unpotting to spot these pests hiding in the soil and root mass.
Recognizing Adult and Nymph Stages
Adult mealybugs are about 1/10 to 1/6 inch long and covered by a waxy, white cotton-like coating. They tend to cluster together in protected areas such as where leaves meet stems or leaf axils. Female nymphs are smaller but look similar, staying mostly stationary, while eggs and crawlers (first-stage nymphs) are tiny and harder to see without close inspection.
Early nymphs, called crawlers, are mobile and pale yellow or pinkish before developing their cottony covering. Adults and older nymphs produce a sticky substance called honeydew, which can cause sooty mold growth on leaves, signaling infestation even when insects are not obvious.
Distinguishing Mealybugs from Similar Pests
Mealybugs are often mistaken for other small white insects like whiteflies or aphids, or for mold and fungus. However, their cottony clusters are denser and waxier-looking compared to powdery mildew. Unlike aphids, mealybugs move slowly and do not fly.
Look closely for a soft-bodied insect under the cottony mass. Whiteflies are quick and fly away when disturbed, whereas mealybugs remain attached to plants. Sticky honeydew and black sooty mold underneath these white patches usually point to mealybugs rather than other issues.
- Observe the white patches carefully to locate soft-bodied insects beneath the cottony wax.
- Gently prod the cluster; mealybugs are slow and do not fly, unlike whiteflies.
- Check for sticky residue and black mold on leaves below the infestation as evidence of sap feeding.
- Compare affected plants to others nearby to identify if the issue is isolated or widespread.
- Consider plant symptoms such as stunted growth or yellowing leaves, which support pest presence.
Warning: Do not confuse harmless soil insects with root mealybugs; look specifically for white waxy clumps on succulent roots to avoid unnecessary treatment.
Inspecting Roots for Hidden Mealybugs
Root mealybugs infest especially succulents and can cause unexplained yellowing or wilting despite healthy-looking stems. Check roots every three months during treatment by carefully unpotting your succulent and examining the root ball for white, cottony masses or waxy blobs.
Use a gentle rinse to remove excess soil and expose roots clearly. Look along thick roots and in root junctions where mealybugs often hide. Manually remove visible pests or dip roots in rubbing alcohol for a few minutes to kill any hidden insects. Be cautious to avoid damaging fragile roots during this process.
- Prepare a clean workspace near your plant for inspection.
- Gently remove the succulent from its pot, taking care to avoid root damage.
- Rinse roots under lukewarm water to remove soil obscuring pests.
- Examine roots closely for small, white, cottony clumps or waxy spots.
- Dab suspect pests with a cotton swab dipped in rubbing alcohol to confirm identification.
- Remove any heavily infested roots if practical, or treat roots with insecticidal soap following product instructions.
- Repot the plant in fresh, sterile soil and monitor regularly for re-infestation.
3. Detailed Mealybug Life Cycle and Reproduction Timeline
Mealybugs reproduce quickly, which makes them challenging to control. A single female lays between 300 and 600 eggs, usually in a cottony mass near where a leaf stem meets the main stem. These eggs hatch within 6 to 14 days, depending on environmental factors like temperature and humidity. The hatching stage means newly emerged mealybugs, called crawlers, will appear regularly after the first treatment if it doesn’t reach the eggs.
The entire life cycle, from egg to adult, generally takes between 23 and 75 days based on species and conditions. Some populations can complete the cycle in as few as two weeks. Higher temperatures and stable indoor environments accelerate reproduction, leading to overlapping generations. This overlap is why one-time treatments often fail and why pests reappear quickly.
Timing treatments effectively requires understanding this cycle. Since eggs survive most sprays and can hatch after the initial application, you need to apply treatments every 7 to 10 days for 8 to 12 weeks. This schedule targets newly hatched crawlers before they mature and reproduce, interrupting the cycle. For example, if you start treatment on day 1, repeat on day 8 and day 15, continuing weekly until no signs of active mealybugs remain.
Direct contact treatments work best with live mealybugs. Dabbing visible bugs with 70% or stronger isopropyl alcohol kills adults quickly, but this won’t affect eggs. Combining alcohol dabs with thorough sprays of insecticidal soap or neem oil helps manage all stages. Neem oil takes longer but breaks the cycle over time, as it affects molting and egg development while being safe for most plants and beneficial insects.
Some mealybug species can survive up to two weeks off the plant, with eggs continuing to hatch. This resilience means you should also inspect and treat nearby plants and plant surfaces regularly. Keeping plants healthy and reducing sources of infestation lowers spread and reproduction speed.
Failing to follow this treatment timeline allows eggs to hatch and restart infestations, making control difficult. Consistency over several weeks, combined with targeting both crawlers and adults, increases the chance of success. If you stop too early, the pest population can rebound, resulting in weeks of repeated treatments. Tracking the infestation’s progress and adjusting treatment intervals based on plant response and pest activity can improve outcomes.
4. Step-by-Step Treatment Plan to Eradicate Mealybugs Safely
To get rid of mealybugs safely, follow a detailed treatment plan that includes isolating the plant, using household treatments like 70% isopropyl alcohol and insecticidal soap, applying neem oil, pruning infested areas, checking roots, and monitoring over several weeks. Consistency and careful observation are key to ensuring all life stages of mealybugs are eliminated without harming your plant.
Isolation and Quarantine Procedures
Start by isolating the infested plant to prevent mealybugs from spreading to others. Choose a well-lit area away from regular plant groups, such as a separate room or an isolated corner of your home. Monitor new plants closely by quarantining them for two to three weeks before introducing them to your collection.
Isolation also allows you to observe treatment effects and avoid cross-contamination. Use waterproof trays beneath pots to catch debris or drips that might carry pests. During quarantine, avoid sharing tools or soil between plants unless disinfected.
Applying Alcohol and Soap Treatments Correctly
Use 70% isopropyl rubbing alcohol to kill mealybugs on contact by applying it with a cotton swab directly to visible pests and egg cases. Always test alcohol on a small, inconspicuous leaf area first to check for leaf damage. Limit alcohol treatments to a maximum of two or three applications per plant because overuse can harm plant tissue.
Insecticidal soap is another safe household option. Spray plants thoroughly so the soap fully covers mealybugs, new eggs, and hiding spots. Soap must make direct contact to work effectively. Reapply insecticidal soap every 7 to 10 days, following label directions, to break the reproduction cycle.
Using Neem Oil and Pruning to Control Mealybugs
Neem oil disrupts mealybug feeding and growth and can be used as part of an ongoing treatment plan. Spray neem oil evenly on all plant surfaces, including undersides of leaves and stems. Reapply neem oil every 7 to 14 days, especially if you detect new signs of infestation. Be sure to avoid spraying in direct sunlight or during the hottest parts of the day to prevent leaf burn.
Prune heavily infested parts of the plant to remove large clusters of mealybugs and reduce the overall pest population. Dispose of pruned materials by sealing them in a plastic bag before throwing them away to prevent spreading pests. Always sterilize pruning tools before and after use.
Monitoring and Repeating Treatments on a Schedule
Keep inspecting the plant closely for at least three weeks after the initial treatment. Mealybugs lay eggs that hatch over time, so persistence is important. Use a flashlight and magnifying glass to detect tiny, cottony clusters or crawlers.
Plan a treatment calendar with applications every 3 to 7 days, alternating between insecticidal soap and neem oil to reduce resistance. Restrict rubbing alcohol spot treatments to the early days to avoid plant damage. Continue until the plant looks healthy and no mealybugs are visible for two full weeks.
- Isolate the infested plant in a separate area with no contact to other plants.
- Inspect and prune off heavily infested leaves or stems, sealing removed materials in plastic for disposal.
- Apply 70% isopropyl alcohol with a cotton swab directly onto visible mealybugs and egg sacs; limit alcohol use to two or three times maximum.
- Spray the plant thoroughly with insecticidal soap, ensuring coverage of all surfaces; repeat every 7 to 10 days.
- Apply neem oil spray every 7 to 14 days, avoiding treatment during hot sunlight to prevent leaf damage.
- Check the plant’s roots for signs of root mealybugs; consider a neem oil soil soak if necessary.
- Monitor the plant under strong light with a magnifying glass every few days for at least three weeks.
- Repeat treatments on schedule until you observe two consecutive weeks without live mealybugs or new damage.
5. How to Prevent Mealybugs from Returning to Your Plants
Start by isolating any new or infested plants for at least two weeks before introducing them to your other houseplants. This prevents mealybugs from spreading unnoticed. Keep a close eye on these plants and regularly check surrounding plants for early signs of pests.
Maintaining plant health is critical. Avoid overwatering or over-fertilizing, which can stress plants and make them more vulnerable. Use non-nitrogen fertilizers if possible, as high nitrogen levels may encourage mealybug outbreaks. Clear away leaf litter and plant debris that can harbor eggs or nymphs, and promptly dispose of pruned cuttings in sealed bags.
Temperature and humidity influence mealybug activity. They thrive in warm, humid conditions between 70°F and 90°F. Lowering indoor temperatures to below 65°F can slow their development and reduce infestations. Improve air circulation around your plants by spacing them out and using fans if needed, since stagnant air supports pest buildup.
- Isolate new or infested plants for a minimum of two weeks
- Inspect neighboring plants every 3 to 4 days for signs of mealybugs
- Use non-nitrogen fertilizer to reduce mealybug food sources
- Remove plant debris promptly to eliminate hiding spots
- Maintain indoor temperatures below 65°F when feasible
- Increase airflow around plants with proper spacing and fans
- Dispose of infected plant parts in sealed bags to prevent spread
Do not keep cuttings or debris around your growing area; mealybugs can survive there for days in moist environments.
Seasonal timing matters. Eggs hatch in about 10 days depending on conditions, so maintain weekly inspections and treatments for at least eight weeks after detecting mealybugs. This time frame covers multiple life cycles, reducing chances of reinfestation. If chemical sprays are necessary, apply insecticides only during cooler parts of the day and avoid treatment above 90°F to prevent plant damage.
Healthy, well-maintained plants resist mealybugs better and recover faster if pests appear. Adjust your care routines to suit your specific plant type and environment, and stay diligent with inspections. In persistent cases, honest plant removal might be the safest option to protect the rest of your collection.
6. Comparison of Mealybug Treatment Methods: Pros and Cons
Choosing between natural and chemical treatments for mealybugs depends on your priorities regarding speed, safety, and the planting environment. Chemical pesticides tend to act faster, often killing mealybugs within hours or days. However, many chemical options are not safe for use on edible plants, indoors, or on delicate houseplants due to toxic residues. Natural treatments like neem oil and insecticidal soaps work more slowly, typically requiring weekly applications for 3 to 4 weeks, but they are safe for edible plants and break down quickly without leaving harmful residues.
Predatory insects such as lady beetles, lacewings, and the mealybug destroyer (Cryptolaemus montrouzieri) offer another natural control method. They can be effective but usually require outdoor or greenhouse use where the predators can survive and find mealybugs continuously. For indoor gardeners, these beneficial insects may be less practical since they can escape or die without a sustained food source. The following table compares key factors of common mealybug treatments based on available research and extension resources:
| Treatment | Speed | Safe for Edible Plants | Indoor Use | Effectiveness |
|---|---|---|---|---|
| Chemical Pesticides | Fast (hours to days) | Usually No | Limited, often no | High, but resistance risk |
| Neem Oil (Natural) | Slow (2-3 weeks for full effect) | Yes, per EPA guidelines | Yes | Good with repeated sprays (7-10 day intervals) |
| Insecticidal Soap | Slow (several weeks) | Yes | Yes | Effective with repeated treatments over 3-4 weeks |
| Predatory Insects | Moderate, population-dependent | Yes | Generally outdoor or greenhouse* | Variable, requires predator establishment |
*Predatory insects may not survive indoors unless plants are moved outside or in controlled environments. A practical decision rule for choosing a mealybug treatment is this: Use neem oil or insecticidal soap if you grow vegetables or indoor edible plants and want to avoid chemicals. Apply these every 7 to 10 days for at least 3 to 4 weeks until no pests appear. Start with a water spray to dislodge large populations, then follow with neem oil mixed according to label instructions (about 2 tablespoons in a spray bottle). Chemical pesticides suit outdoor ornamental plants that can tolerate residue and where quick results outweigh safety concerns. Predatory insects offer a natural option for outdoor or greenhouse setups when you wish to avoid sprays altogether but require patience and monitoring for predator establishment.
Good results from natural treatments look like gradual reduction of mealybug numbers over weeks, with no damage to the plants or beneficial insects. Chemical treatments may show fast kill rates but risk harming pollinators, beneficial insects, or indoor air quality. Remember, no treatment kills mealybug eggs, so repeated applications covering several weeks are essential for full control.
7. Recognizing Treatment Success and Troubleshooting Common Issues
Successful treatment of mealybugs shows clear signs within one to two weeks. You’ll notice fewer visible bugs on leaves and stems during daily or every-other-day inspections. New infestations won’t appear, and damaged areas begin to recover, with less sticky residue and healthier-looking foliage. When bugs remain in large numbers or the plant’s condition worsens, the treatment likely isn’t working and needs adjusting.
Common mistakes include incomplete coverage of the plant, skipping hidden spots like leaf axils and stem joints, and using too little treatment or too infrequently. Mealybugs reproduce quickly, so missing larvae can cause reinfestation. Another error is overusing soap or neem oil, which can burn leaves, especially if applied during hot weather or in direct sunlight. Always apply these treatments in the early morning or late afternoon and follow recommended concentrations exactly. For example, keep dish soap to 2 tablespoons (30 ml) per gallon of water to avoid damage.
Repeated use of neem oil or soap rarely causes mealybugs to develop true resistance since these affect them physically rather than chemically. Still, bugs may hide deeper or reinfest if you stop treatments too soon. Combining rubbing alcohol spot treatment with weekly neem oil sprays can reduce survival chances and target all life stages effectively.
When rubbing alcohol or neem oil causes leaf burn, immediately stop using the product and wash the plant gently with plain water to remove residues. Leaf damage signals sensitivity or environmental stress like temperatures above 85°F (29°C) or excessive sun exposure during application. Move the plant to a shaded area and use a diluted treatment next time. Consider switching to less harsh methods like manual removal during recovery or using leaf shine sprays containing neem oil, which are gentler.
- Inspect plants every 3 to 4 days with a magnifying glass focusing on leaf axils and stems.
- Dab visible mealybugs with 70% isopropyl rubbing alcohol for quick knockdown.
- Spray neem oil mixed with 2 tablespoons of dish soap per gallon, repeating weekly for several weeks.
- Apply treatments during cooler parts of the day to avoid leaf burn.
- Use manual removal to complement chemical treatments.
- Stop treatment if severe leaf damage occurs and rinse plants gently.
- Continue monitoring for reinfestation at least 4 weeks after mealybugs disappear.
Monitoring treatment success means looking for gradual decline in active mealybugs and improvements in the plant’s vitality. Adjust frequency or methods if reinfestations or plant stress appear. Persistent infestations may require repeating initial control steps or a different treatment combination. Maintaining consistent care and avoiding environmental stress improves your plants’ ability to recover and resist mealybugs over time.
8. How to Inspect Plants and Monitor Mealybugs Effectively
Inspecting your plants regularly helps catch mealybugs early, often before serious damage occurs. Focus on both above-ground parts and roots, as mealybugs can hide in protected areas. Checking every 7 to 10 days matches their life cycle and improves control success.
Visual Checks of Leaves and Stems
Start by examining leaves and stems closely, paying special attention to where leaves meet stems. These joints are common hiding spots for mealybugs, especially young colonies. Look for white, cottony masses and sticky residue called honeydew. Use a magnifying glass if needed to spot tiny crawlers that may not be visible to the naked eye.
Strong spray from a hose or handheld sprayer can dislodge many mealybugs, making it easier to spot the remaining population. Gently turn leaves over and check the undersides, veins, and stem crevices thoroughly every time you inspect your plants.
Examining the Root Zone Carefully
Mealybugs sometimes live on roots, especially on succulents where the soil is loose and drainage holes allow entry. Removing the plant gently from its pot and inspecting roots, pot rims, and drainage holes can reveal hidden egg masses or nymphs. Check for fluffy white patches, sticky residues, or stunted root growth.
Root infestations often cause wilting or yellowing despite watering. Use a soft brush or cotton swab dipped in rubbing alcohol to clean visible mealybugs off the roots. Repot the plant in fresh soil if an infestation is found to reduce re-infestation risk.
Wear gloves and be gentle when handling roots to avoid damaging your plants during inspection.
Scheduling Regular Monitoring Sessions
Plan to inspect plants every 7 to 10 days during mealybug treatment, matching the pest’s life cycle, which is about 15 to 30 days from egg to adult. This interval catches new crawlers emerging after pesticide or natural treatments kill adults and eggs. Continue inspections for at least two cycles to confirm eradication.
Keep records of your inspections noting date, plant affected, infestation signs, and treatments applied. This checklist approach helps track progress and identifies persistent problem areas or plants needing extra care. Digital notes or printed charts work well for home gardeners.
- Gather a magnifying glass, gloves, a flashlight, cotton swabs, rubbing alcohol, and a notebook or app for records.
- Inspect new plants thoroughly before adding them to your collection to avoid introducing mealybugs.
- Examine leaves and stems, focusing on leaf axils and stem junctions, turning leaves over for full visibility.
- Use a hose or sprayer to dislodge visible mealybugs, then wipe remaining bugs with a cotton swab dipped in alcohol.
- Remove potted plants from pots carefully to check roots, pot rims, and drainage holes for hidden mealybugs.
- Note observations about infestation severity and locations in your record-keeping tool.
- Repeat inspection every 7 to 10 days through at least two full mealybug life cycles.
Step-by-Step Action Plan to Get Rid of Mealybugs
Follow these clear steps to identify, treat, and prevent mealybugs on your plants effectively. Track your progress to ensure the pests are fully eliminated and your plants stay healthy.
- Before you start: Thoroughly inspect all leaves and roots for white, cottony spots and tiny moving insects. Confirm the presence of mealybugs by their distinct appearance. This allows you to target the infestation accurately.
- Day 1: Isolate affected plants to prevent spreading. Use a cotton swab dipped in rubbing alcohol to remove visible mealybugs manually. You’ll see pests vanish on contact.
- Days 2, 5: Apply an insecticidal soap or neem oil spray evenly on leaves and stems, repeating every 2 days. Monitor for a decline in visible bugs and sticky residue from honeydew.
- Week 2: Check roots carefully for hidden mealybugs and treat with a safe systemic insecticide as per product instructions if needed. Notice fewer signs of feeding damage and fewer bugs.
- Weeks 3, 4: Continue weekly inspections; prune heavily infested foliage. Maintain preventive sprays every 7 to 14 days. Watch for no new cottony clusters or leaf yellowing.
- After 1 month: Implement routine plant hygiene, clean leaves, avoid overwatering, keep humidity moderate. Healthy growth and no fresh mealybug signs indicate success.
- Ongoing: Inspect new plants before bringing them home and quarantine for a week. Regularly scout all plants for early signs to catch infestations fast and avoid recurrence.
Frequently Asked Questions
Can Mealybugs Survive on Plant Cuttings?
Yes, mealybugs can survive on moist plant cuttings, so discard cuttings immediately to prevent spread. Removing them quickly limits reinfestation risks.
Are Pheromone Traps Useful Indoors for Mealybugs?
Pheromone traps are mostly effective outdoors; they work less effectively inside homes. Use other treatments like insecticidal soap for indoor plants.
Can Neem Oil Harm Sensitive Houseplants?
Neem oil is generally safe but can cause leaf burn on some sensitive species. Test a small area first to avoid damage.
How Often Should I Inspect Roots for Mealybugs?
Check succulent roots every three months during treatment. Early root inspection helps catch hidden infestations.
Do Mealybugs Always Need Chemical Insecticides to Be Controlled?
No, organic options like horticultural oil or insecticidal soap can often eliminate mealybugs without chemicals. Choose based on plant sensitivity.
Is It Necessary to Treat Every Plant in the House?
Treat all infested plants to prevent spread; isolated plants alone may not stop reinfestation. Consistent treatment across plants is best.
The Bottom Line
Getting rid of mealybugs requires consistent effort and close attention to your plants. Regularly inspect your leaves and roots for any signs of these pests, even after treatment. Today, set a reminder to examine your favorite plants carefully and remove any small patches of cottony residue you find before the infestation grows. This small step helps keep your plants healthy and pest-free over time.