

How to Get Rid of Bats: A Complete Guide for Safe, Humane Removal
To get rid of bats safely, start by identifying where they’re entering your home and seal those points promptly. Using humane exclusion devices allows bats to leave but not return, especially after mid-August when young bats mature. This approach avoids harm while effectively clearing your space. A thorough inspection followed by proper sealing helps prevent their return over time.
This guide is for homeowners or renters dealing with bats around their property. You’ll learn how to spot signs of bats, understand legal protections, use exclusion devices correctly, handle occasional indoor encounters safely, evaluate removal methods, and implement lasting bat-proofing strategies. These steps offer practical ways to reclaim your home without risking harm to the animals or your family.
Key Takeaways
- Look for signs like medium-sized bats with 13-16 inch wingspans and glossy brown fur to identify big brown bats in your home.
- Seal entry points such as cracks halfway inch wide and six inches long to block common bat access paths effectively.
- Remove bats after August 1st to avoid orphaning flightless young inside your home during the removal process.
- Use one-way exclusion devices for 4-7 days to ensure all bats exit before permanently sealing entry points during daylight hours.
- Handle bats indoors carefully; release them only when temperatures exceed 50°F with calm, dry weather to maximize survival chances.
- Rely on professional wildlife services for complex infestations, especially when legal protections and humane timing guidelines apply.
How to Identify If You Have Bats in Your Home

Bats living inside your home usually leave clear signs you can spot without special tools. You might notice bats flying near your roofline around dusk as they leave to feed. Inside, you could hear scratching or fluttering noises in the attic or behind walls, especially after sunset. These sounds often indicate a colony roosting nearby. Seeing bats flying indoors or finding them trapped is another strong sign. These bats tend to gather in sheltered, quiet spots like attics, eaves, or behind shutters.
Bat droppings, called guano, are a key sign of their presence indoors. Guano looks like small, dark pellets typically found piling under roosting areas. It has a distinct musty smell and can accumulate over time, staining wood or insulation below. If you spot guano, it means bats have been using your space regularly. Droppings also attract insects which can create secondary pest issues.
Knowing these signs helps you decide if you need to act or get professional help. Don’t try to seal any bat entry during the maternity season, which lasts until about mid-August, or you risk trapping young bats inside. Observation over multiple evenings and physical inspection during daylight for droppings or entry points is the best approach.
- Watch your roofline and eaves at dusk for bats flying out
- Listen for fluttering or scratching sounds in the attic after dark
- Check for small, dark bat droppings under rafters or near entry points
- Look for oily stains or dirt around small gaps where bats enter
- Notice sudden insect attraction or musty odors in rarely accessed areas
- Spot live bats inside your home, especially near windows or chimneys
- Inspect small cracks and openings in your roof or vents during the day
Regular monitoring works well for minor bat activity. For large or persistent infestations, professionals provide specialized inspections using tools to find all entry points and assess colony size safely. Quick detection limits damage and health risks from guano buildup or bat-borne pathogens. Acting early protects your living space and avoids costly repairs later.
Why Bats Enter Homes and Which Entry Points They Use
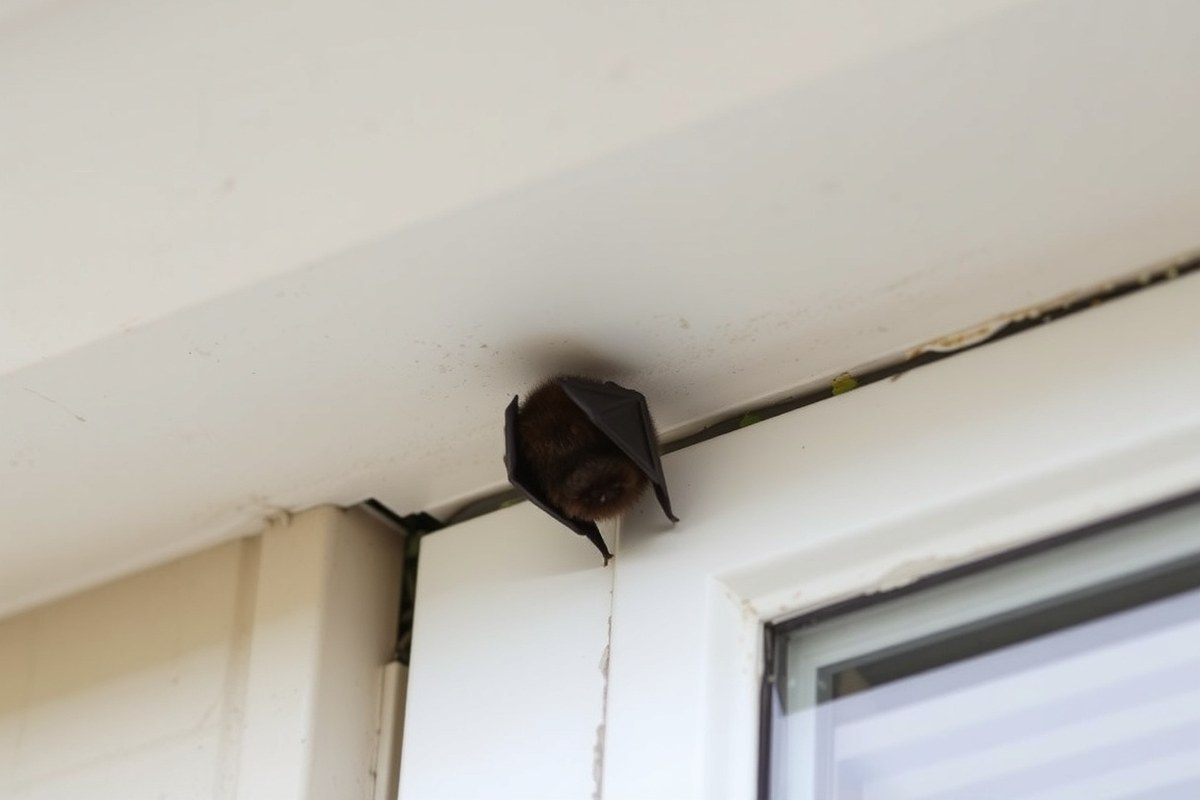
Bats enter homes primarily seeking shelter, warmth, and safe spaces to roost and raise their young. Attics, wall voids, and similar quiet, dark areas with stable temperatures provide an ideal environment. If your house offers easy access points and a cozy interior environment, bats may use it as a temporary or permanent roost.
Proper identification of the entry points bats use is critical to effectively exclude them. These points are often small and easily overlooked. Common access spots include gaps as narrow as ½ inch wide. Bats can squeeze through spaces around vents, chimney gaps, damaged fascia boards, loose soffits, or cracks in siding. They may also enter through openings near windows, doors, or where utility lines and pipes penetrate exterior walls.
Inspect your home thoroughly, focusing on areas adjacent to rooflines, eaves, attic vents, and corners where building materials meet. Look for brownish, greasy stain marks along the edges of entry holes from bats’ fur rubbing against surfaces. These signs help confirm active use.
- Check roof edges, eaves, and soffit vents for loose or missing screening
- Inspect chimney flashing and caps for gaps or openings
- Look around utility penetrations such as cables, pipes, and wires
- Examine cracks or separations in siding or wood trim
- Inspect attic vents and windows for unsealed gaps
- Check for holes along the foundation or crawl space vents, especially if close to the attic
Sealing entry points with durable, bat-proof materials is the most reliable way to keep bats out. Use caulk, steel wool, hardware cloth, or sturdy mesh to close these openings. Applying fine netting or mesh over vents and crevices also blocks access while allowing ventilation. For active bat colonies, install a one-way exclusion device on the main entry holes: it lets bats leave but prevents reentry. After confirming all bats have exited, permanently seal the holes.
Do not seal entry points before August 1st; excluding bats too early risks leaving flightless young trapped inside.
Homes in warmer climates or regions with harsh winters may see bats seeking consistent warmth and shelter more frequently. Regular maintenance to identify and seal new gaps reduces chances bats will find their way indoors again. Providing an alternative roost, such as a mounted bat box away from your house, encourages bats to relocate without harm.
Legal Protections and Humane Bat Removal Timing
Bats are protected under various state and federal wildlife laws, which means you cannot simply remove or harm them at any time. Many species are listed as endangered or threatened, making illegal handling subject to fines and penalties. Before attempting bat removal, check with your state’s wildlife agency to understand local laws and permitted exclusion periods. The only legal and humane method for removing bats is exclusion, which involves installing one-way exit devices that allow bats to leave but prevent reentry. This method protects the bats while effectively clearing your home.
The timing of bat exclusion is critical to avoid abandoning vulnerable pups unable to fly. The best season for safely excluding bats is late summer through early spring, typically from mid-August to April. Maternity season, from May through mid-August, is when female bats give birth and raise their young. Excluding bats during this period risks leaving flightless pups trapped inside, leading to their death and legal issues for mistreatment. Some states may have slightly different protected periods, so contacting local wildlife officials for exact dates is essential.
Starting exclusion work right after maternity season ends ensures that adult bats can exit freely at night while pups have matured enough to fly out themselves. You will need to install one-way exit devices on all known entry points, especially around eaves or rooflines, to prevent bats from returning. These devices should remain in place for several days to verify no bats remain inside. After confirming successful exclusion, seal the openings with materials like steel mesh or caulk strong enough to resist bat gnawing. Leaving any gaps could cause a re-infestation or trap bats improperly.
An example timeline would be beginning inspection and preparation in early August, installing one-way devices by mid-August, and completing sealing before September. During exclusion, avoid sealing holes during daylight or immediately after bats leave, as some may temporarily remain inside. Professional pest control services specializing in bat removal can advise on exact timing and handle device installation safely and legally, often charging between $300 and $1,000 depending on the property’s size and infestation level. Improper timing or sealing can result in trapped bats inside walls or attics, increasing noise and odor problems and risking bat health and legal consequences.
Humane bat removal and adherence to legal protections not only help you avoid fines but also support local ecosystems. Bats provide natural insect control and pollination benefits, so removing them without harm ensures these roles continue while protecting your home. Following the seasonal decision checklist, avoid maternity season and use one-way exclusion devices after pups can fly, will keep the process safe, legal, and effective.
Step-by-Step Bat Inspection and Sealing Checklist
Conducting a complete inspection and sealing all bat entry points is necessary to remove bats safely and prevent their return. This involves locating all gaps larger than 1/4 inch, using proper materials to seal them, and allowing at least two weeks for bats to exit through one-way exclusion devices before permanently closing openings.
Tools and Materials Required for Sealing
You’ll need caulk, expanding foam, weatherstripping, and durable materials like hardware cloth or flashing for permanent repairs. A flashlight and a ladder help inspect hard-to-reach areas. For exclusion devices, installing specialized netting or bat cones is essential to let bats exit without reentry.
Caulk and foam seal small cracks, while weatherstripping covers movable gaps like between shutters and windows. Hardware cloth or flashing is best for larger openings or structural repairs. Keep a caulk gun handy for applying sealants neatly and tightly. Gloves, eye protection, and masks protect you during installation.
Measuring and Identifying Entry Point Sizes
Look for any holes or cracks larger than 1/4 inch, since bats can squeeze through very small openings. Use a measuring tape or ruler to measure width and height of each visible gap. Typical entry points include spaces around roof vents, soffits, chimneys, attic vents, gaps behind shutters, and damaged siding.
Mark all openings on a home blueprint or property diagram for reference. Note that some points can be less visible, scanning with a flashlight during dusk or dawn reveals movement or fresh staining. A professional inspection can help find hidden or difficult access points, especially in older homes or multi-story buildings.
Proper Sealing Techniques for Different Gaps
Seal gaps smaller than 1/2 inch with silicone or acrylic latex caulk. Use expanding foam for gaps between 1/2 inch and 1 inch, but avoid overfilling to prevent mess or damage. Larger holes need hardware cloth reinforced with flashing or metal mesh, secured with screws or nails for a permanent barrier.
Begin by placing one-way exit tools like bat cones or mesh tubes on the primary entrances. Keep these devices installed for a minimum of 14 days to guarantee all bats have departed before permanently sealing. After this time, take away the exclusion devices and secure all openings fully, ensuring there are no gaps that would allow bats to get back inside.
- Inspect all sides of your home, including the roofline, eaves, vents, chimneys, and windows, using a flashlight and ladder if needed.
- Measure each opening larger than 1/4 inch and note their location and size for repair planning.
- Install one-way exclusion devices at primary bat entry points to allow bats to leave while preventing re-entry.
- Wait at least 14 days to ensure the bat colony has exited through the exclusion devices.
- Seal small gaps under 1/2 inch with caulk; use expanding foam for gaps between 1/2 and 1 inch.
- For larger holes, secure hardware cloth or flashing over the opening with screws or nails for a durable seal.
- Check closely around shutters and soffits, sealing any points that bats might use to get behind these features.
- After sealing, monitor the area for any remaining activity and re-inspect periodically to maintain a bat-proof home.
How to Use One-Way Exclusion Devices Effectively
One-way exclusion devices let bats leave your home but stop them from coming back inside. You place them over active bat entry points after ensuring the timing is right, usually in spring, to avoid trapping young bats. After installing, keep the device in place for about two weeks before sealing off other gaps permanently.
Types of One-Way Exclusion Devices
There are several types of one-way exclusion devices designed specifically for bats. One common option is a plastic or metal tube that bats can crawl out of but cannot re-enter. Another is netting or mesh that acts as a one-way flap, allowing exit but blocking re-entry. Some devices come as pre-made “bat excluders” or one-way doors that fit over the main openings used by bats. These devices rely on the bats’ behavior of exiting but not attempting to re-enter through the same opening immediately.
Choosing the right device depends on your home’s entry points and conditions. Tubes work well on small, narrow gaps, while netting can cover larger spaces or rough surfaces. The device must be designed to prevent bats from squeezing back in, so a tight fit and durable materials are essential.
Correct Installation Tips
Proper installation ensures the one-way exclusion device works effectively and safely. Follow these steps for the best results:
- Identify all active bat entry points by observing bats at dusk.
- Seal any secondary gaps that bats are not currently using with caulk, steel wool, or mesh.
- Leave the primary entry point open and install the one-way exclusion device securely over it.
- Attach the device using screws, staples, or strong adhesive to prevent bats from slipping back in.
- Check that the device hangs or extends far enough to prevent bats from flying back inside.
- Monitor the exit point at dusk to confirm bats are leaving but not returning.
- Leave the device in place for at least 14 days to allow all bats to exit, including young ones.
Never seal the main entrance before installing the one-way device; doing so traps bats inside and harms them.
Using these installation steps helps avoid common issues like bats finding alternate re-entry points or young bats being left behind. The exclusion device must be well-attached to prevent damage from wind or animals.
Timing a Complete Exclusion Project
Timing the use of one-way exclusion devices is critical to avoid harming bats or violating wildlife laws. Install devices in early spring after bats emerge from hibernation but before they have dependent young. This timing ensures all bats can exit without leaving babies trapped inside.
The one-way device should remain in place for about two weeks, which allows time for all adult bats and their pups to leave. After this period, permanently seal all entry points except the one with the exclusion device still attached. Once bats stop exiting, remove the device and seal the last opening to prevent their return.
This has to be coordinated with local wildlife regulations, as many areas protect bats during maternity and hibernation seasons. Bat-exclusion professionals recommend scheduling work carefully to comply with these laws and protect the colony’s health.
Handling Bats Indoors and Safe Cleanup Practices
Seeing a bat flying inside your home can be unsettling, but it’s important to stay calm and handle the situation with care to avoid bites and health risks. Close off doors to other rooms to contain the bat in one area and turn off overhead lights while opening windows or exterior doors to create an exit path. Bats are most active at temperatures above 50°F and prefer calm weather for flying out, so wait for suitable conditions if possible before trying to release it.
To catch and release a bat safely, wear thick gloves to protect against bites and avoid handling it with bare hands. Use a small container, like a plastic box or coffee can, and gently trap the bat by slowly covering it. Slide a stiff piece of cardboard under the container to securely hold the bat inside without harm. Transport the bat outside immediately and place it on a tree or improve surface away from children and pets before carefully removing the cover to let it fly away. Avoid releasing bats in cold, windy, or rainy weather, as stressed bats may not survive.
Bat droppings, or guano, carry health risks, including histoplasmosis, a respiratory illness caused by inhaling fungal spores found in the guano. Before cleaning, wear protective gear: a fitted N95 mask, disposable gloves, and long sleeves to minimize exposure. Never sweep or vacuum dry guano, as this can release spores into the air. Instead, spray the droppings lightly with a disinfectant solution or water mixed with bleach (1 part bleach to 10 parts water) to dampen the area. After soaking for at least 15 minutes, use a damp cloth or mop to carefully remove the guano.
Dispose of the collected material in a sealed plastic bag and clean all tools thoroughly. Wash your hands and clothing separately after the cleanup. The cost for supplies like gloves, mask, and disinfectant generally totals under $30 and can protect you from serious health consequences. If the infestation is extensive or you suspect bat urine contamination, hiring a professional experienced in bat cleanup may be necessary to ensure safe removal and disinfection.
Handling bats and their droppings carries risks, including potential rabies exposure, so avoid touching bats directly and keep pets and children away from areas where bats have roosted. Persistent nuisance or large infestations often require professional intervention that complies with local laws and prioritizes humane removal. Setting up an alternative bat house outdoors can encourage bats to roost away from your home once they are excluded safely.
Comparing Bat Removal Methods: DIY, Repellents, and Professionals
You have several options for dealing with bats, including doing it yourself, using repellents, or hiring a professional. Each method varies in cost, effectiveness, and legal considerations, so understanding these factors can help you choose the right approach.
DIY removal might seem appealing to save money. This usually involves sealing entry points after bats leave at dusk using exclusion devices or physical barriers. However, handling bats yourself carries risks such as improper sealing, legal violations, or disturbing protected species. Professionals have the training and equipment to safely remove bats and repair your home to prevent re-entry. Their fees vary widely, typically ranging from $300 to over $1,000 depending on infestation size and home condition.
Some people turn to bat repellents like sprays and ultrasonic devices marketed as deterrents. According to Bat Conservation International, ultrasonic devices have no scientific support for effectiveness. Chemical repellents, mothballs, and bright lights are unreliable or potentially harmful to bats. Natural repellents or homemade solutions may only cause temporary avoidance, not long-term removal, and could stress bats, some of which are protected by laws prohibiting harm or killing. Using repellents alone without exclusion methods usually fails to solve bat problems completely.
| Removal Method | How It Works | Cost Range | Effectiveness | Legal Considerations |
|---|---|---|---|---|
| DIY Exclusion | Seal entry points after bats exit, use one-way devices | Low; $20 to $100 for materials | Effective if done correctly and at proper time | Legal if done outside maternity season; must avoid harming bats |
| Commercial Repellents | Sprays, granules, or devices targeting bat senses | Moderate; $30 to $150 | Generally low; short-term deterrence only | Legal, but harming bats is prohibited; effectiveness unproven |
| Ultrasonic Devices | Emit high-frequency sound to deter bats | Low to moderate; $25 to $200 | Not scientifically proven; often ineffective | Legal but discouraged; no guarantee of safety or success |
| Professional Removal | Inspection, humane exclusion, repairs, cleanup | High; $300 to $1,000+ | Most reliable long-term solution | Legal if licensed and done with permits if required |
| Poison or Lethal Methods | Killing bats using chemicals or traps | Varies; often illegal | Illegal and harmful to bat populations | Prohibited by most state and federal laws |
Starting with proper exclusion and physical repairs provides the best chance of success without harming bats. Simple deterrents may help prevent new colonies if combined with sealing efforts. Ultrasonic devices and chemical repellents should not replace exclusion steps. You must also follow timing regulations; for example, exclude bats outside their maternity period to avoid trapping babies inside. Consulting professionals ensures compliance with local laws and reduces risk of exposure to disease or injury. Killing or poisoning bats is illegal in many places and harms important wildlife.
Preventing Bat Return and Long-Term Bat-Proofing Strategies
After bats are removed, preventing their return requires thorough sealing of all potential entry points and ongoing maintenance of your property’s exterior. Long-term bat-proofing stops new colonies from settling in and keeps your home comfortable and safe. Taking measured steps in managing outdoor roosts and providing alternative habitats can also help reduce bat pressure on your home.
Sealing and Maintaining Home Exterior
Completely sealing your home’s exterior prevents bats from slipping back inside. Start by inspecting all areas of your roofline, eaves, vents, soffits, and gaps around pipes and chimneys. Use durable materials like stainless steel mesh or caulk to close openings larger than a quarter inch wide, the typical minimum size bats use for entry.
Keep in mind that bat exclusion should be done outside of maternity season, typically late summer to early fall, to avoid trapping young bats inside. Regular inspections every 6 to 12 months are important since weather or settling can cause new gaps. This maintenance strategy helps you catch new vulnerabilities early, greatly lowering the chances of reinfestation.
- Seal gaps and cracks larger than ¼ inch with metal mesh, caulk, or expandable foam
- Check attic vents, chimney caps, and soffits for openings and repair promptly
- Trim any tree branches touching your roof to eliminate easy bat access
- Keep gutters clear of leaves and debris to reduce bat-friendly hiding spots
- Inspect roof shingles and siding for damage or loose sections regularly
Make sure to seal entry points only after all bats have left, using one-way devices or professional guidance to avoid trapping bats inside.
Managing Outdoor Bat Roosts Responsibly
Bats living in trees or other nearby structures on your property may try to relocate to your home if their current roost becomes unsuitable. Maintain tree health and manage potential roosting sites wisely. Removing dead limbs and thinning dense leaf cover reduces the appeal for bats without hurting local bat populations essential for insect control.
Since bats tend to return to the same roosts year after year, avoid disturbing their known outdoor habitats during maternity season, generally May through August. If you must remove or alter tree roosts to protect your home, consult local wildlife regulators or bat experts first to comply with legal protections and minimize ecological impact.
Using Bat Houses to Encourage Relocation
Installing bat houses offers an alternative place for bats to roost, which can prevent them from returning to your home. Position these houses 12 to 20 feet above the ground, in a sunny spot receiving 6 to 8 hours of direct sunlight daily, preferably on a pole or building away from predator cover.
Place bat houses early in the season, spring or early summer, so bats can discover them before maternity season. Though bats show strong site fidelity, providing a suitable alternative can increase the chance they switch roosts voluntarily, especially if your home is fully sealed.
- Mount bat houses at least 12 feet high on poles or buildings
- Ensure 6-8 hours of direct sun exposure daily for warmth
- Install bat houses away from bright lights and heavy tree cover
- Maintain bat houses by cleaning every few years, avoiding disturbance during occupancy
- Combine bat houses with home sealing to encourage bats to relocate rather than try to re-enter
Bat houses alone won’t keep bats out of your home; sealing all entry points remains essential for permanent control.
Step-by-Step Action Plan to Get Rid of Bats
Follow these steps to identify, safely exclude, and prevent bats from living in your home while respecting legal protections and health safety.
- Day 1: Identify Bat Presence, Check your home for signs like droppings, noises at dusk, and visible bats near entry points. Confirm you have bats before proceeding to exclusion.
- Day 2: Inspect and Map Entry Points, Examine the attic, eaves, vents, and other potential openings for gaps or damage bats can use. Mark all possible entry sites to target in sealing.
- Day 3 to 5: Plan Exclusion During Legal Season, Ensure it’s the appropriate season for bat removal in your region to avoid harming pups (usually late summer to early fall). If not, schedule removal accordingly.
- Day 6: Install One-Way Exclusion Devices, Attach one-way tubes or netting over identified openings to allow bats to exit but not re-enter. Confirm bats stop exiting within a few nights.
- Day 10: Seal All Bat Entry Points, After confirming no bats remain inside, use caulk, mesh, or sealant to permanently close gaps larger than 1/4 inch. Check all previously marked locations.
- Day 11: Perform Indoor Cleanup Safely, Wear protective gear and use disinfectants to clean droppings and guano. Properly dispose of waste to reduce health risks.
- Week 3: Monitor for Bat Return, Regularly inspect sealed areas and attic spaces for renewed bat activity or signs of entry. Immediate repairs prevent re-infestation.
- Month 2 and Beyond: Maintain Bat-Proofing, Keep vents screened, repair wear and tear promptly, and remove attractants like stacked wood near your house to ensure bats stay away for good.
Frequently Asked Questions
What Is the Fastest Way to Get Rid of Bats?
The fastest way to get rid of bats is by using one-way exclusion devices to let them leave but not return. Leave the device up for 4-7 days during daylight hours to ensure all bats exit before sealing entry points.
What Do Bats Hate the Most?
Bats dislike bright lights and sudden noises the most. Installing motion-activated lights near roosting spots like attics can help keep them away effectively.
What Will Keep Bats Away?
Sealing all entry points to your home is the most reliable way to keep bats away. This prevents access and lowers the chance of repeat infestations better than repellents alone.
What Time of Year Do Bats Leave?
Bats typically leave by mid-August when they mature and are ready to fly on their own. Avoid eviction attempts before then to prevent trapping young bats inside.
Can I Use Ultrasonic Devices to Repel Bats?
Ultrasonic devices might help as a precaution but offer no guaranteed full removal or long-term prevention of bats.
Are Essential Oils Effective for Bat Control?
Essential oil sprays can deter bats temporarily, but sealing entry points remains the key to long-term control.
Final Thoughts
Removing bats from your home requires careful timing and humane methods to protect both you and the bats. Start by inspecting your property for common entry points and sealing any gaps before dusk when bats are most active. Taking this first step today can significantly reduce the chances of bats entering your living space again.





One Comment