

How to Get Rid of Carpenter Ants: A Complete Guide for Fast, Effective Control
To get rid of carpenter ants effectively, start by identifying the ants and locating their nests. Use targeted methods like boric acid baits, insecticides, and direct nest treatments to eliminate the colony quickly. Maintaining dry wood and fixing moisture issues helps prevent future infestations.
This guide is for homeowners or renters facing a carpenter ant problem or wanting to keep them out. You’ll learn how to spot carpenter ants, recognize infestation signs, choose the right treatments, and avoid common mistakes when handling these wood-damaging pests yourself.
Key Takeaways
- Carpenter ants are larger than regular ants, measuring 1/4 to 5/8 inch, and leave sawdust outside their nests, unlike termites.
- Look for carpenter ant nests in moist wood, stumps, dying trees, and within 50 feet of your home or garage for new colonies.
- Use baits, boric acid, and insecticide sprays that kill ants on contact and provide residual control for up to 13 weeks or longer.
- Moisture and decayed wood attract carpenter ants, so removing damp wood and fixing leaks is key to reducing infestations.
- Expect to see a 90-100% reduction in carpenter ant activity within 7 to 10 days after treatment, with complete elimination in 1 to 2 weeks.
- Prevent carpenter ants from returning by removing wood debris around your home and applying long-lasting barrier treatments for up to 21 days.
How to Identify Carpenter Ants and Distinguish Them from Termites

Carpenter ants are large ants typically measuring between 1/4 and 1/2 inch long, noticeably bigger than most common ants, which are about 0.2 inches. Their bodies have a smooth, rounded thorax with a single narrow waist segment, which helps distinguish them from termites, whose waists are broad and straight. Carpenter ants often appear black, red, or a combination of both, and their antennae bend sharply, unlike the straight antennae of termites.
Recognizing carpenter ants correctly matters because their behavior and damage patterns differ significantly from termites and other ants. Carpenter ants do not eat wood; they tunnel through wood that is already softened by moisture or decay to create their nests. This tunneling leaves behind coarse sawdust-like debris, called frass, which piles outside their nest entrances. Termites, on the other hand, consume wood by eating it directly, producing smooth, mud-packed tunnels or galleries inside dry wood or soil. Termite damage often looks more uniform, while carpenter ant damage appears rougher and shredded.
For identification, examine the ants and the damage around your home. Carpenter ants have a heart-shaped or evenly rounded thorax when viewed from the side, whereas termites have a more rectangular shape with no narrowing at the waist. Wings also differ: termite wings are equal length and look fragile, but carpenter ant wings are unequal, with the front pair longer than the back. If you find flying insects indoors during spring or early summer, these could be reproductive carpenter ants emerging from their nests.
Another key difference relates to moisture and wood condition. Carpenter ants only excavate into soft or moisture-damaged wood, so areas near leaks, water damage, or rotting boards are common nesting sites. Look for damaged wood with smooth galleries or tunnels and the presence of coarse wood shavings. Regular ants usually don’t damage wood but may appear indoors if attracted to food or moisture, and their small size and behaviour differ.
Pinpointing carpenter ants involves following their trails back to nesting sites, looking for ant sizes larger than typical household ants. Using a magnifying glass can help identify their distinct antenna bends and body shape. You might also spot piles of sawdust and small holes in wood surfaces. Since carpenter ants vary by region, in some places they might exhibit reddish or black coloring, but size and body shape remain reliable markers.
Identifying them quickly helps you act before they cause structural damage that can lead to costly repairs. Mistaking carpenter ants for termites often leads to ineffective treatments because the approaches differ. Carpenter ants require locating and treating nests with targeted products, while termite control often involves soil treatment or baiting systems. Being able to differentiate these insects ensures you choose the right method to eliminate them efficiently.
Signs of a Carpenter Ant Infestation and Where to Look for Nests
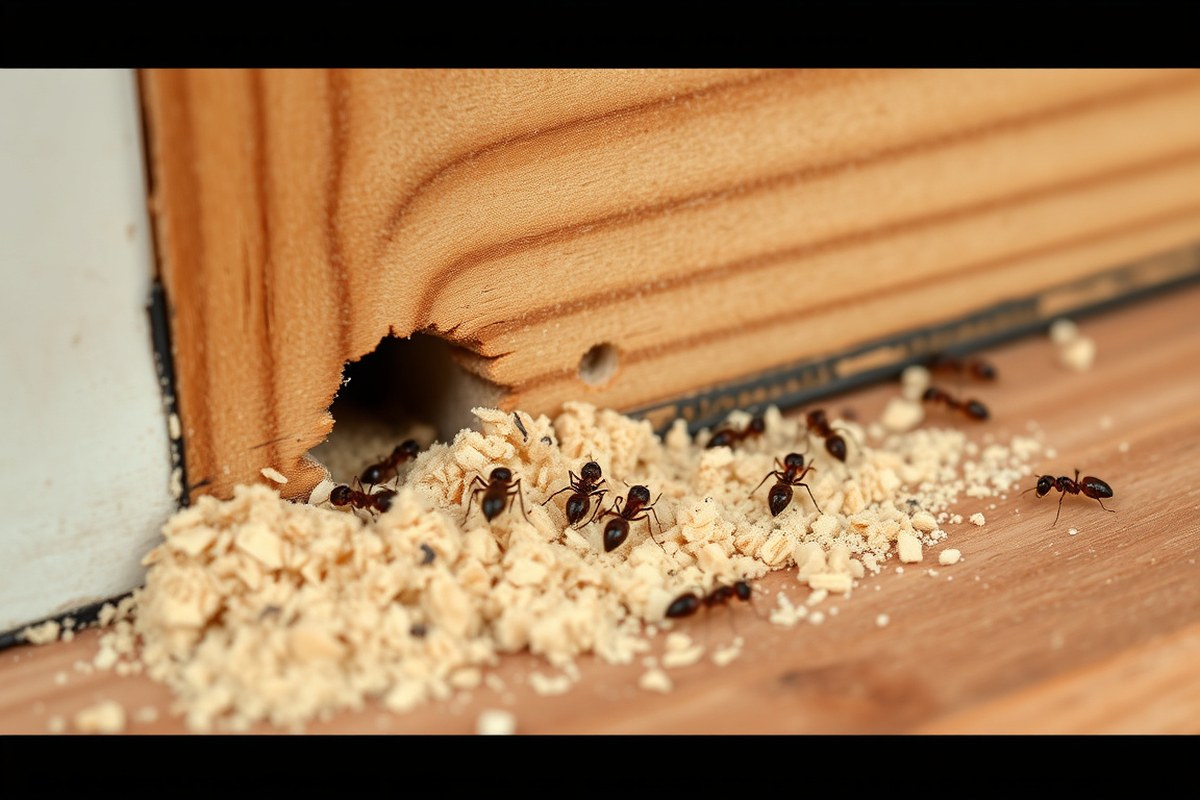
Carpenter ants leave distinct signs that help you spot an infestation early. Look for sawdust piles near wooden areas, winged ants indoors, and active trails to locate nests. Both inside and outside your home, knowing where to inspect is key to effective removal.
Indoor Signs to Watch For
Inside your home, carpenter ants commonly nest within walls, furniture, or wooden structures where moisture has softened the wood. Look for small piles of fine, wood-colored sawdust called frass near baseboards, window sills, or door frames. You may also notice rustling sounds inside walls or hollow-sounding wood. Swarms of winged carpenter ants indoors during spring indicate an established colony nearby.
Another clear sign is spotting worker ants foraging at night, especially along electric wires, pipes, or baseboards. Because carpenter ants do not eat wood but tunnel through it, any damaged wood that feels smooth and hollow also signals their activity. Early detection helps prevent extensive structural damage and stops colonies from expanding.
Common Outdoor Nest Locations
Outdoors, nests are often found in trees with holes, decayed wood, or stumps. Carpenter ants prefer trees larger than 6 inches in diameter, especially those with existing cavities or moisture damage. Look for piles of sawdust at the base of trees or near wooden outdoor structures such as decks and fence posts.
Mulch beds, wood piles, and shrubbery close to your home also provide ideal nesting sites. Black carpenter ants generally stick to treeholes, while some species more readily establish nests in wooden structures around your yard. Following ant trails at night often leads directly to outdoor nests.
Best Times to Conduct Inspections
Use the early evening hours about 15 to 20 minutes after sundown to inspect outdoor nests by shining a flashlight on tree trunks or potential sites. Carpenter ants are more active at night, making it easier to spot trails and entry points during this time. Indoor inspections can be done anytime but focus on early morning or daytime when worker ants may be visible.
Inspect regularly during spring and summer when carpenter ants swarm or forage the most. Frequent checks help catch infestations before they grow too large or spread inside walls or wood structures. Annual inspections, especially in moist or wooded areas near your home, also reduce long-term damage risk. Use this step-by-step checklist to track down carpenter ant nests:
- Observe visible ants indoors or outdoors and note where they enter or exit.
- Follow ant trails from inside the home to outside areas to locate primary and satellite nests.
- Inspect wood structures for smooth or hollow-sounding surfaces and check for sawdust piles called frass.
- Examine trees larger than 6 inches in diameter, focusing on holes, cavities, or areas with bark damage.
- Check mulch beds, wood piles, and shrubbery within 5 feet of your home’s foundation.
- Use a flashlight after dark to spot active trails on tree trunks or wooden surfaces.
- Look behind drywall or inside wall voids for noise, sawdust, or ant activity.
- Note any winged carpenter ants indoors, especially during spring when they are swarming.
Directly treating identified nest sites is important; applying insecticides only where ants are seen often fails to eliminate the colony fully.
Effective Methods to Get Rid of Carpenter Ants: Baits, Boric Acid, and Insecticides
To get rid of carpenter ants effectively, you can rely on a combination of bait stations, boric acid, and insecticide sprays. Bait stations target the colony by attracting ants to carry poison back to the nest, while boric acid works when applied directly to infestation areas. Insecticides provide immediate control on contact and can create barriers to prevent reinfestation.
Carpenter Ant Bait Stations Explained
Bait stations contain slow-acting poison mixed with attractive food that ants carry back to their colony. This method works best for controlling small or early infestations. Place bait stations near ant trails, entry points, or areas where you’ve seen carpenter ants actively foraging.
Carpenter ants have a varied diet, so baits may need to be supplemented with other control methods. Expect bait stations to take several days to a few weeks to show results because the poison must reach the queen and nest to stop the colony. Avoid spraying insecticides around bait stations, as this can deter ants from feeding on the bait.
Stores sell effective commercial baits, but many do not specifically target carpenter ants. Ready-to-use options can cost around $5 to $15 per station and should be replaced every few weeks or when consumed.
Using Boric Acid Safely and Effectively
Boric acid offers a low-toxicity option for carpenter ant control when you apply it correctly. It acts as a stomach poison when ants ingest it and as a slow-acting dust on contact. Use powdered or dust forms like Harris Termite Powder or Combat Liquid Ant Bait with boric acid as the active ingredient.
Apply boric acid dust into wall voids, cracks, and around nests using a duster or a small brush. It’s important to keep the area dry because moisture reduces boric acid’s effectiveness. Avoid excessive application to prevent health risks to pets and children, and always follow package safety instructions. Boric acid is inexpensive, typically $10 to $20 per container, and can help reduce carpenter ant populations when combined with structural repairs and hygiene.
Selecting and Applying Insecticides
Retail insecticide sprays can provide quick knockdown of carpenter ants and create barriers lasting up to 21 days. Products labeled for ants or termites often contain active ingredients like bifenthrin or permethrin that are effective on contact. Indoor application should focus around baseboards, window sills, door thresholds, and nesting sites like infested wood or wall voids.
Barrier treatment sprays can discourage new ants but alone may not eradicate large colonies. Using foggers or bombs is generally not recommended due to limited effectiveness against carpenter ants nesting inside wood and safety concerns from widespread chemical exposure. For high-value properties or severe infestations, licensed pest control professionals access stronger insecticides and specialized treatment methods not available in retail products. The table below compares key treatments for carpenter ants based on effectiveness, safety, and application effort:
| Method | Effectiveness | Safety | Recommendations |
|---|---|---|---|
| Inspect, Repair & Seal Structure | Very effective | Low risk | Essential first step |
| Licensed Pest Control Treatments | Very effective | Moderate risk | Best for large infestations |
| Retail Insecticides (Sprays, Dusts) | Somewhat effective | Moderate risk | Good for small/early infestations |
| Bait Stations | Variable effectiveness | Low risk | Place on ant trails; may take weeks |
| Boric Acid | Effective with proper application | Low risk if used carefully | Apply as dust in nests and voids |
Using a combination of these treatments improves your chances to control carpenter ants. Monitor treated areas regularly and replace baits or reapply dust and sprays as instructed to maintain effectiveness.
How Moisture and Wood Conditions Influence Carpenter Ant Infestations
Carpenter ants prefer moist wood because it is softer and easier to excavate for nesting. Excess moisture in and around your home creates ideal conditions for these ants to establish colonies, especially if wood shows signs of rot or water damage. Without moisture control, infestations can start suddenly when ants locate damp wood to expand their nests.
Sources of Excess Moisture Near Homes
Excess moisture often originates from leaks around plumbing fixtures like sinks, tubs, and toilets. Areas where water splashes or drips near wooden structures, such as window sills or baseboards, can keep wood damp and vulnerable. Roof leaks or poor drainage can also allow water to collect near the foundation or wooden siding, creating a moist environment that attracts carpenter ants.
Controlling moisture means fixing leaks promptly, improving ventilation in basements and crawl spaces, and ensuring gutters and downspouts direct water away from the house. Installing dehumidifiers in damp areas, especially during humid months, can help keep moisture levels below 50%, discouraging ant nesting. The cost of these moisture control measures varies widely but often ranges from $100 to $500 for basic repairs and ventilation improvements.
Types of Wood Prone to Infestation
Carpenter ants target wood that is moist and beginning to decay, including rotting windowsills, fence posts, decks, and wood around water sources. Structural wood damaged by water leaks inside walls or attics is a common nesting site. Ants also colonize firewood stored directly against homes and dead tree limbs around the yard.
Wood that stays dry and sound is far less attractive to carpenter ants because it requires much more effort to hollow out. Replacing moisture-damaged wood with treated or naturally rot-resistant materials reduces the likelihood of infestation. When replacing wood, ensure it is thoroughly dried and sealed to prevent future moisture absorption.
Effects of Rotting Wood on Ant Activity
Rotting wood softens as fungal decay breaks down structural fibers, making it easier for carpenter ants to chew galleries for their nests. Ants don’t eat the wood but hollow it out to create living space, which can cause structural damage to homes and outdoor structures. The presence of sawdust-like shavings, or frass, near wood is a clear indicator of infestation.
If left untreated, carpenter ants will expand colonies within rotted wood and create satellite nests in adjacent dry wood, increasing the risk of widespread damage. Removing rotted wood promptly and maintaining dry conditions can slow or prevent further nesting activity.
Seasonal Moisture Variations Impacting Colonies
During rainy seasons, wood absorbs more moisture, and carpenter ants become more active in seeking new nesting sites due to increased dampness. In contrast, dry seasons often force colonies to move towards homeowners’ homes to find moisture and shelter. This seasonal behavior explains why carpenter ant invasions sometimes appear suddenly.
Maintaining consistent moisture control year-round reduces the likelihood of ants relocating indoors during dry periods. Regular inspections for leaks and wood damage are important, especially after heavy rains or extended dry spells, as these conditions influence ant colony movements and expansion.
Timeline and Expectations: How Long It Takes to Eliminate Carpenter Ants Completely
Eliminating a carpenter ant colony completely usually takes several weeks after the initial treatment. Most professional approaches reduce carpenter ant activity by 90-100% within the first 7 to 10 days. This happens because baits and non-repellent treatments are designed for worker ants to unknowingly carry the poison back to all nests, including the main colony and its satellite nests. The full colony dies off as the toxic substance spreads among the ants, reaching the queen and cutting off reproduction.
Retreating is often unnecessary if you use a targeted, multi-step treatment that covers all ant trails and nests. However, monitoring is important for at least a month after treatment. Frequent checks every 7 to 10 days help you spot any remaining or newly active satellite nests. If you detect continued activity, a follow-up treatment may be required to catch hidden or newly established colonies. Seasonal changes also affect the timing and success of treatment. Carpenter ants expand rapidly with warming temperatures in spring and early summer, producing 9 to 12 satellite nests as they grow. Treating early in the season helps stop the colony before it spreads widely.
Colony removal can be more complicated if nests are located outdoors and connected to satellite nests in or near the home. These situations may require longer monitoring or professional follow-up, especially because carpenter ants can produce swarmers after about five years, which start new colonies close by. The presence of ants alone doesn’t always indicate an urgent problem, but eliminating the colony is important to prevent structural damage.
For a thorough approach, professionals conduct detailed inspections to locate as many nests as possible before treatment. They apply non-repellent products that worker ants carry to the queen and developing ants. Treatment success is maximized by targeting all satellite nests, especially in warm months when colonies grow rapidly. Homeowners can expect noticeable reduction of visible ants within days and complete colony elimination within three to six weeks if the treatment plan is followed carefully.
Regularly inspect window sills, baseboards, and wooden structures during and after treatment to catch new ant activity early before it develops into a larger colony problem.
Preventing Carpenter Ants from Returning After Treatment
Preventing carpenter ants from returning after treatment depends on making your home less inviting to them. Carpenter ants are attracted to moist or decayed wood and easy food sources, so controlling these factors reduces the chances of reinfestation. Regularly inspecting your home’s exterior, especially during late winter and early spring when carpenter ants become active, helps catch new activity before it escalates.
Start by sealing any cracks, gaps, or openings around foundations, eaves, windows, and doors. Carpenter ants often use these entry points to get inside. Pay special attention to living or dead trees near your home; avoid piled wood or branches touching the house since they provide nesting sites and food sources. Keep gutters clean and repair leaks to prevent excess moisture, which weakens wood and attracts ants. Maintain your home through a checklist that covers key prevention areas:
- Seal cracks and gaps around the home’s exterior using caulk or expandable foam
- Remove wood debris, firewood, and tree branches from against or near the house
- Fix leaky pipes, faucets, and roof issues to reduce wood moisture
- Keep gutters and drains clear to avoid water buildup
- Trim vegetation so it doesn’t touch the house’s siding or roof
- Store food and garbage in sealed containers to eliminate indoor attractants
- Regularly inspect potential nesting spots like window wells, siding joints, and under porches
Applying an insecticide perimeter treatment around your home’s foundation can establish a protective barrier to deter carpenter ants. According to pest control guidelines, this treatment may last up to 12 weeks, requiring reapplication before effectiveness wanes. Mixing insecticide use with regular moisture control and structural maintenance is the best way to prevent reinfestation.
Homes in damp climates or with old wooden structures may require more frequent inspections. Watch for sawdust-like material near window sills and baseboards indoors, signaling reinfestation. Avoid storing firewood inside or near your house during ant season, and remove stumps or rotten wood close to your foundation.
Safety Measures and Common Mistakes When Removing Carpenter Ants Yourself
Wearing protective gear can prevent exposure to harmful insecticides and reduce skin irritation. Gloves made of nitrile or latex protect your hands when handling baits or sprays. Wearing long sleeves, pants, and closed shoes helps prevent insecticide contact on your skin. Goggles or safety glasses shield your eyes from accidental splashes. A dust mask is recommended if using powdered insecticides to avoid inhaling particles. These precautions matter because many ant control products contain chemicals that can irritate skin, eyes, or respiratory systems.
Insecticides used for carpenter ants can pose poisoning risks to pets and family members if applied improperly. Keep children and pets out of treated areas until sprays are fully dry, usually 2 to 4 hours. Store baits and insecticides in locked cabinets away from curious hands and paws. Avoid applying insecticides on surfaces pets lick or walk on frequently. Using baits inside ant trails instead of broad sprays can reduce exposure risks. Common household pets such as dogs and cats are especially sensitive to pyrethroids and boric acid products if ingested in big amounts.
- Wear gloves, long sleeves, and eye protection when applying insecticides.
- Keep children and pets away from treated areas until products dry completely.
- Do not apply insecticides near pet food bowls or sleeping areas.
- Follow label instructions exactly regarding dosage and safety precautions.
- Avoid overusing sprays; targeted baits are safer and often more effective.
- Ensure proper ventilation in closed rooms when using sprays indoors.
- Dispose of empty insecticide containers according to local regulations.
Some common mistakes when dealing with carpenter ants yourself include using the wrong products or applying treatments incorrectly. Spraying perimeter soil like termite treatments is unnecessary and wastes money. Applying too little insecticide may fail to reach the nest, while overusing it can contaminate your home environment. Ignoring the moisture problem in wood invites ant return even after treatments. Rushing treatments without following up within 2 weeks fails to eliminate newly maturing workers. Mixing and applying products without reading labels can lead to toxic exposure or ineffective results. Finally, not sealing entry points or removing damaged wood leaves the infestation source untreated.
Taking a cautious, planned approach by wearing protective gear, managing exposure risks for family and pets, and applying the correct products precisely improves your chances of eliminating carpenter ants safely. Expect to spend around $20 to $50 on basic protective gear and insecticide supplies. Proper preparation and patient monitoring often deliver better results than repeated heavy use of sprays. Avoid spraying indoors repeatedly unless directed on the product label or advised by a pest professional, as this can create resistance or health hazards.
When to Call a Professional for Carpenter Ant Removal
You should consider calling a professional for carpenter ant removal if your DIY efforts have not stopped the infestation or if you suspect multiple nests in or around your home. Professionals have access to tools and insecticides that are often stronger and more effective than those available to consumers. They conduct thorough inspections to locate all nests, including hidden ones that you might overlook, and address potential structural damage caused by ants burrowing into wood.
Deciding between continue DIY treatment and hiring a pro depends on the infestation’s severity and your comfort level handling pesticides or destructive infestations. A small infestation with a clearly visible nest and a few worker ants may be manageable using bait stations and boric acid. But if you observe dozens of large carpenter ants, frequent ant trails inside your home, or discover more than one nesting area, professional intervention is usually necessary. Professionals can also provide follow-up visits to ensure complete elimination, which is critical given the ants’ ability to relocate nests.
Professional treatments typically include a detailed inspection of the entire property, including attics, crawl spaces, and exterior wood, which are common nesting sites. They apply specialized insecticides approved for indoor and outdoor use, often targeting the colony’s queen and larvae effectively. This treatment often involves applying liquid sprays and dusts in wall voids or other inaccessible areas, something that homeowners may not safely do. Costs for professional service vary depending on region and infestation size but generally range from $300 to $800 per visit; follow-ups might be included or charged separately.
In contrast, DIY methods usually involve buying traps, baits, or available insecticide sprays and applying them yourself. This approach costs less upfront, typically $20 to $50 for materials, but requires patience and consistent application over weeks or months. DIY might not fully resolve the infestation if the nest is large, spread out, or if hidden structural damage is attracting ants. Also, improper application of insecticides can lead to ineffective results or safety hazards.
Using a simple decision approach, if you notice limited ant activity near a easily accessible nest, try a DIY approach first. Set bait stations and treat visible wood damage with boric acid. Monitor ant activity for two to four weeks. If you see no significant reduction or find ants spreading to new areas, calling a professional becomes necessary. Large infestations with multiple nests and signs of wood damage near structural components should prompt immediate professional treatment to protect your property.
Never attempt to remove or disturb large carpenter ant nests inside walls without proper knowledge; this can cause colony fragmentation and worsen the infestation.
Step-by-Step Action Plan to Get Rid of Carpenter Ants
Follow this timeline to identify, eliminate, and prevent carpenter ants effectively, knowing when to wait for results or call a pro.
- Day 1: Identify and Inspect, Confirm the ants are carpenter ants by checking for large, black or reddish ants with segmented bodies and no wings. Look for signs like sawdust piles near wooden structures or rustling noises inside walls to find nests.
- Day 2: Locate Moisture Problems, Check areas with damp or rotting wood such as basements, window sills, and around plumbing. Fix leaks and dry out these spots to reduce attractants.
- Day 3: Set Baits or Apply Boric Acid, Place carpenter ant baits near trails and suspected nest entrances following product instructions. You’ll know it’s working when you see fewer ants on trails after several days.
- Week 1: Treat Nests With Insecticide, Use a targeted insecticide spray on nests you locate, including voids inside walls if accessible. Effectiveness shows when ant activity around treated areas significantly drops within a week.
- Weeks 2 to 4: Monitor and Repeat Treatments, Continue observing ant activity, reapplying baits or sprays if you still see ants for at least two more weeks to catch any surviving nest members.
- After 1 Month: Inspect Again and Prevent, Confirm no new ant trails or wood damage. Caulk cracks, remove wood debris near your home, and maintain dry conditions to prevent reinfestation.
- Any Time: Know When to Call a Professional, If you find large or multiple nests inside walls, or if DIY methods fail after a month, hire pest control experts who can safely remove ants and access hard-to-reach colonies.
Frequently Asked Questions
Why Do I Suddenly Have Carpenter Ants in My House?
Carpenter ants enter homes searching for food and nesting sites, especially in moist or rotting wood. Changes in weather or nearby construction can drive them indoors. Checking for leaks or wood damage can help identify why they appeared.
What Smell Do Carpenter Ants Hate?
Carpenter ants dislike strong scents like citrus and vinegar, which can help repel them. Using natural cleaners with these odors may deter ants around entry points but won’t eliminate an infestation.
How Do You Find a Carpenter Ant Nest?
Look for sawdust piles near wood structures and follow ant trails at night with a flashlight. Carpenter ants create semi-permanent trails leading to hidden nests in wood.
Will Carpenter Ants Ever Go Away?
Carpenter ants won’t leave on their own if there’s accessible wood or food. Complete removal requires baiting or insecticide treatment targeting both ants and nests.
Can Carpenter Ants Damage Furniture?
Yes, carpenter ants tunnel in wood, potentially damaging furniture, framing, and other wooden items if untreated.
Do Carpenter Ants Bite Humans?
Carpenter ants can bite but rarely cause serious harm; bites might feel sharp but aren’t venomous.
The Bottom Line
Getting rid of carpenter ants requires thorough inspection and targeted treatment, especially around moisture-prone wood areas in your home. Start by checking for damp or damaged wood today, as fixing these conditions can prevent further infestations. Taking this first step helps protect your home while you decide if more advanced pest control measures are needed.



3 Comments